UI相关

笔记

  • new View(),它的layoutParam默认是wrap_content

  • wrap_content看的是 子view 的大小,match_parent看的是 父view 的大小。

    父view 是wrap_content,子view1 有个是具体值 则父view 大小就是子view1的大小(其他子view 是match_parent最大也是 子view1 的大小)(子view1的位置也可以不在第一个位置)【即具体值优先

SurfaceView

SurfaceView使用步骤

  1. 继承SurfaceView实现 SurfaceHolder.Callback 重写三方法
  2. 在构造方法中获得SurfaceHolder对象:getHolder
  3. 在构造方法中SurfaceHolder对象通过调用addCallback获得回调函数
  4. 在surfaceCreated中进行SurfaceHolder对象通过调用lockCanvas锁定画布,获得Canvas对象
  5. Canvas进行绘制操作
  6. SurfaceHolder对象通过调用unlockCanvasAndPost解锁画布

SurfaceView双缓冲应用

双缓冲是为了防止动画闪烁而实现的一种多线程应用,基于SurfaceView的双缓冲实现很简单,开一条线程并在其中绘图即可。本文介绍基于SurfaceView的双缓冲实现,以及介绍类似的更高效的实现方法。

SurfaceView每次绘图都会锁定Canvas,也就是说同一片区域这次没画完下次就不能画,因此要提高双缓冲的效率,就得开一条线程专门画图,开另外一条线程做预处理的工作。

1
2
3
4
5
6
7
8
9
10
11
12
13
14
15
<?xml version="1.0" encoding="utf-8"?>
<LinearLayout xmlns:android="http://schemas.android.com/apk/res/android"
android:layout_width="fill_parent" android:layout_height="fill_parent"
android:orientation="vertical">

<LinearLayout android:id="@+id/LinearLayout01"
android:layout_width="wrap_content" android:layout_height="wrap_content">
<Button android:id="@+id/Button01" android:layout_width="wrap_content"
android:layout_height="wrap_content" android:text="单个独立线程"></Button>
<Button android:id="@+id/Button02" android:layout_width="wrap_content"
android:layout_height="wrap_content" android:text="两个独立线程"></Button>
</LinearLayout>
<SurfaceView android:id="@+id/SurfaceView01"
android:layout_width="fill_parent" android:layout_height="fill_parent"></SurfaceView>
</LinearLayout>
1
2
3
4
5
6
7
8
9
10
11
12
13
14
15
16
17
18
19
20
21
22
23
24
25
26
27
28
29
30
31
32
33
34
35
36
37
38
39
40
41
42
43
44
45
46
47
48
49
50
51
52
53
54
55
56
57
58
59
60
61
62
63
64
65
66
67
68
69
70
71
72
73
74
75
76
77
78
79
80
81
82
83
84
85
86
87
88
89
90
91
92
93
94
95
96
97
98
99
100
101
102
103
104
105
106
107
108
109
110
111
112
113
114
115
116
117
118
119
120
121
122
123
124
125
126
127
128
129
130
131
132
133
134
135
136
137
138
139
140
141
142
143
144
145
146
147
148
149
150
151
152
153
154
155
156
157
158
159
160
161
162
163
164
165
166
167
168
169
170
171
172
173
package com.testSurfaceView;

import java.lang.reflect.Field;
import java.util.ArrayList;
import android.app.Activity;
import android.graphics.Bitmap;
import android.graphics.BitmapFactory;
import android.graphics.Canvas;
import android.graphics.Paint;
import android.graphics.Rect;
import android.os.Bundle;
import android.util.Log;
import android.view.SurfaceHolder;
import android.view.SurfaceView;
import android.view.View;
import android.widget.Button;

public class TestSurfaceView extends Activity {
/** Called when the activity is first created. */
Button btnSingleThread, btnDoubleThread;
SurfaceView sfv;
SurfaceHolder sfh;
ArrayList<Integer> imgList = new ArrayList<Integer>();
int imgWidth, imgHeight;
Bitmap bitmap;//独立线程读取,独立线程绘图

@Override
public void onCreate(Bundle savedInstanceState) {
super.onCreate(savedInstanceState);
setContentView(R.layout.main);

btnSingleThread = (Button) this.findViewById(R.id.Button01);
btnDoubleThread = (Button) this.findViewById(R.id.Button02);
btnSingleThread.setOnClickListener(new ClickEvent());
btnDoubleThread.setOnClickListener(new ClickEvent());
sfv = (SurfaceView) this.findViewById(R.id.SurfaceView01);
sfh = sfv.getHolder();
sfh.addCallback(new MyCallBack());// 自动运行surfaceCreated以及surfaceChanged
}

class ClickEvent implements View.OnClickListener {

@Override
public void onClick(View v) {

if (v == btnSingleThread) {
new Load_DrawImage(0, 0).start();//开一条线程读取并绘图
} else if (v == btnDoubleThread) {
new LoadImage().start();//开一条线程读取
new DrawImage(imgWidth + 10, 0).start();//开一条线程绘图
}

}

}

class MyCallBack implements SurfaceHolder.Callback {

@Override
public void surfaceChanged(SurfaceHolder holder, int format, int width,
int height) {
Log.i("Surface:", "Change");

}

@Override
public void surfaceCreated(SurfaceHolder holder) {
Log.i("Surface:", "Create");

// 用反射机制来获取资源中的图片ID和尺寸
Field[] fields = R.drawable.class.getDeclaredFields();
for (Field field : fields) {
if (!"icon".equals(field.getName()))// 除了icon之外的图片
{
int index = 0;
try {
index = field.getInt(R.drawable.class);
} catch (IllegalArgumentException e) {
// TODO Auto-generated catch block
e.printStackTrace();
} catch (IllegalAccessException e) {
// TODO Auto-generated catch block
e.printStackTrace();
}
// 保存图片ID
imgList.add(index);
}
}
// 取得图像大小
Bitmap bmImg = BitmapFactory.decodeResource(getResources(),
imgList.get(0));
imgWidth = bmImg.getWidth();
imgHeight = bmImg.getHeight();
}

@Override
public void surfaceDestroyed(SurfaceHolder holder) {
Log.i("Surface:", "Destroy");

}

}

/**
* 读取并显示图片的线程
*/
class Load_DrawImage extends Thread {
int x, y;
int imgIndex = 0;

public Load_DrawImage(int x, int y) {
this.x = x;
this.y = y;
}

public void run() {
while (true) {
Canvas c = sfh.lockCanvas(new Rect(this.x, this.y, this.x
+ imgWidth, this.y + imgHeight));
Bitmap bmImg = BitmapFactory.decodeResource(getResources(),
imgList.get(imgIndex));
c.drawBitmap(bmImg, this.x, this.y, new Paint());
imgIndex++;
if (imgIndex == imgList.size())
imgIndex = 0;

sfh.unlockCanvasAndPost(c);// 更新屏幕显示内容
}
}
};

/**
* 只负责绘图的线程
*/
class DrawImage extends Thread {
int x, y;

public DrawImage(int x, int y) {
this.x = x;
this.y = y;
}

public void run() {
while (true) {
if (bitmap != null) {//如果图像有效
Canvas c = sfh.lockCanvas(new Rect(this.x, this.y, this.x
+ imgWidth, this.y + imgHeight));

c.drawBitmap(bitmap, this.x, this.y, new Paint());

sfh.unlockCanvasAndPost(c);// 更新屏幕显示内容
}
}
}
};

/**
* 只负责读取图片的线程
*/
class LoadImage extends Thread {
int imgIndex = 0;

public void run() {
while (true) {
bitmap = BitmapFactory.decodeResource(getResources(),
imgList.get(imgIndex));
imgIndex++;
if (imgIndex == imgList.size())//如果到尽头则重新读取
imgIndex = 0;
}
}
};
}

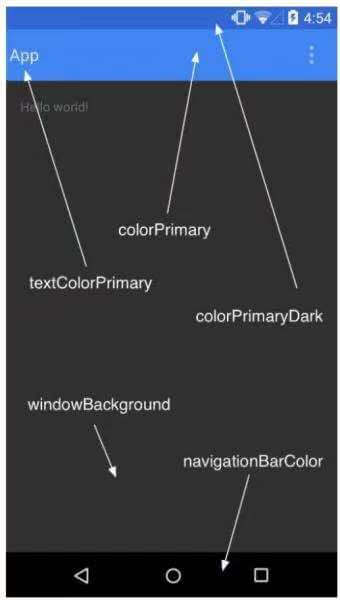
安卓自带的几个颜色

安卓自带的几个颜色.jpg

  • colorPrimaryDark:状态栏颜色
  • colorPrimary:appbar颜色
  • textColorPrimary:appbar左侧字体颜色
  • windowBackground:屏幕颜色
  • navigationBarColor:导航栏颜色

让整个App变灰色

方法一:

1
2
3
4
5
6
7
8
9
10
11
12
13
14
15
16
17
18
public View onCreateView(@Nullable View parent, @NonNull String name, @NonNull Context context, @NonNull AttributeSet attrs){
if("FrameLayout".equalss(name)){
int count = attrs.getAtrributeCount();
for (int i = 0; i < count; i++) {
String attributeName = attrs.getAttributeName(i);
String attributeValue = attrs.getAttributeValue(i);
if (attributeName.equals("id")) {
int id = Integer.parseInt(attributeValue.substring(1));
String idVal = getResources().getResourceName(id);
if ("android:id/content".equals(idVal)) {
GrayFrameLayout grayFrameLayout = new GrayFrameLayout(context, attrs);
return grayFrameLayout;
}
}
}
}
return super.onCreateView(parent, name, context, attrs);
}

方法二:

1
2
3
4
5
setContentView(R.layout.activity_scrolling) 
val paint = Paint()
val cm = ColorMatrix()
cm.setSaturation(0f)
paint.colorFilter = ColorMatrixColorFilter(cm) window.decorView.setLayerType(View.LAYER_TYPE_HARDWARE, paint)

布局

LinearLayout线性布局

有权重layout_weight来设置各自布局大小比例

百分比布局

PercentRelativeLayout百分比布局

PercentFrameLayout百分比布局

是新增的布局

具体使用:

  1. app/build.gradle的dependences闭包中添加

    1
    2
    3
    4
    dependencies{
    compile 'com.android.support:percent:24.2.1'
    ...
    }
  2. 在布局中使用

    1
    2
    3
    4
    5
    6
    7
    8
    9
    10
    11
    12
    13
    14
    15
    16
    17
    18
    19
    20
    21
    22
    23
    24
    25
    26
    27
    28
    29
    30
    <android.support.percent.PercentFrameLayout
    xmlns:android="http://schemas.android.com/apk/res/android"
    xmlns:app="http://schemas.android.com/apk/res-auto"
    android:layout_width="match_parent"
    android:layout_height="match_parent">
    <Button
    android:id="@+id/button1"
    android:text="Button 1"
    android:layout_gravity="left|top"
    app:layout_widthPercent="50%"
    app:layout_heightPercent="50%"/>
    <Button
    android:id="@+id/button2"
    android:text="Button 2"
    android:layout_gravity="right|top"
    app:layout_widthPercent="50%"
    app:layout_heightPercent="50%"/>
    <Button
    android:id="@+id/button3"
    android:text="Button 3"
    android:layout_gravity="left|bottom"
    app:layout_widthPercent="50%"
    app:layout_heightPercent="50%"/>
    <Button
    android:id="@+id/button4"
    android:text="Button 4"
    android:layout_gravity="right|bottom"
    app:layout_widthPercent="50%"
    app:layout_heightPercent="50%"/>
    </android.support.percent.PercentFrameLayout>

    PercentFrameLayout还有FrameLayout的属性,所以加了layout_gravity属性使得上面的布局就是左上、右上、左下、右下四个按钮均分的。

动画

补间动画

1
2
3
4
5
6
7
8
<?xml version="1.0" encoding="utf-8"?>
<set xmlns:android="http://schemas.android.com/apk/res/android">
<!--"-100%:屏幕不可见";“0%:屏幕中间”-->
<translate
android:fromXDelta="-100%"
android:toXDelta="0%"
android:duration="300"/>
</set>
1
2
3
4
5
6
7
8
9
10
11
12
<?xml version="1.0" encoding="utf-8"?>
<set xmlns:android="http://schemas.android.com/apk/res/android">
<!--pivot指定缩放的中心点,不指定默认是从左上角;scale=0.0不可见,1.0完全可见-->
<scale
android:fromXScale="0.0"
android:fromYScale="0.0"
android:toXScale="1.0"
android:toYScale="1.0"
android:pivotY="50%"
android:pivotX="50%"
android:duration="300"/>
</set>

Bitmap

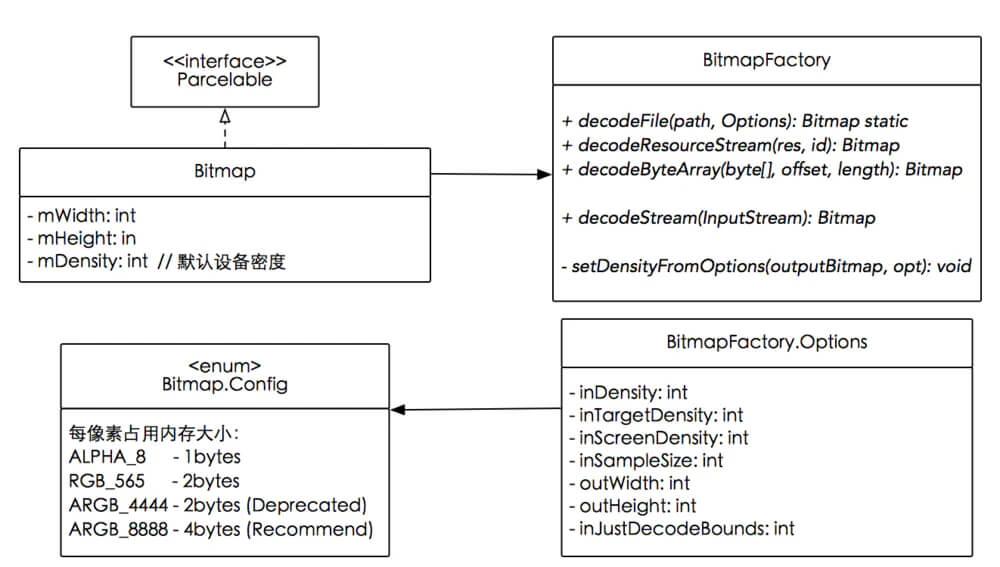
安卓/Bitmap类图

配置信息与压缩方式

Bitmap中有两个内部枚举类:

  • Config是用来设置颜色配置信息
  • CompressFormat是用来设置压缩方式
Config 单位像素所占字节数 解析
Bitmap.Config.ALPHA_8 1 颜色信息只由透明度组成,占8位
Bitmap.Config.ARGB_4444 2 颜色信息由rgba四部分组成,每个部分都占4位,总共占16位
Bitmap.Config.ARGB_8888 4 颜色信息由rgba四部分组成,每个部分都占8位,总共占32位。是Bitmap默认的颜色配置信息,也是最占空间的一种配置
Bitmap.Config.RGB_565 2 颜色信息由rgb三部分组成,R占5位,G占6位,B占5位,总共占16位
RGBA_F16 8 Android 8.0 新增(更丰富的色彩表现HDR)
HARDWARE Special Android 8.0 新增 (Bitmap直接存储在graphic memory)

通常我们优化Bitmap时,当需要做性能优化或者防止OOM,我们通常会使用Bitmap.Config.RGB_565这个配置,因为Bitmap.Config.ALPHA_8只有透明度,显示一般图片没有意义,Bitmap.Config.ARGB_4444显示图片不清楚,Bitmap.Config.ARGB_8888占用内存最多。

CompressFormat 解析
Bitmap.CompressFormat.JPEG 表示以JPEG压缩算法进行图像压缩,压缩后的格式可以是”.jpg”或者”.jpeg”,是一种有损压缩
Bitmap.CompressFormat.PNG 颜色信息由rgba四部分组成,每个部分都占4位,总共占16位
Bitmap.Config.ARGB_8888 颜色信息由rgba四部分组成,每个部分都占8位,总共占32位。是Bitmap默认的颜色配置信息,也是最占空间的一种配置
Bitmap.Config.RGB_565 颜色信息由rgb三部分组成,R占5位,G占6位,B占5位,总共占16位

常用操作

裁剪、缩放、旋转、移动

1
2
3
4
5
6
7
8
9
Matrix matrix = new Matrix();  
// 缩放
matrix.postScale(0.8f, 0.9f);
// 左旋,参数为正则向右旋
matrix.postRotate(-45);
// 平移, 在上一次修改的基础上进行再次修改 set 每次操作都是最新的 会覆盖上次的操作
matrix.postTranslate(100, 80);
// 裁剪并执行以上操作
Bitmap bitmap = Bitmap.createBitmap(source, 0, 0, source.getWidth(), source.getHeight(), matrix, true);

虽然Matrix还可以调用postSkew方法进行倾斜操作,但是却不可以在此时创建Bitmap时使用。

Bitmap与Drawable转换

1
2
3
4
5
6
7
8
9
10
11
12
13
14
// Drawable -> Bitmap
public static Bitmap drawableToBitmap(Drawable drawable) {
Bitmap bitmap = Bitmap.createBitmap(drawable.getIntrinsicWidth(), drawable.getIntrinsicHeight(), drawable.getOpacity() != PixelFormat.OPAQUE ? Bitmap.Config.ARGB_8888 : Bitmap.Config.RGB_565);
Canvas canvas = new Canvas(bitmap);
drawable.setBounds(0, 0, drawable.getIntrinsicWidth(), drawable.getIntrinsicHeight();
drawable.draw(canvas);
return bitmap;
}

// Bitmap -> Drawable
public static Drawable bitmapToDrawable(Resources resources, Bitmap bm) {
Drawable drawable = new BitmapDrawable(resources, bm);
return drawable;
}

保存与释放

1
2
3
4
5
6
7
8
9
10
11
12
13
14
15
16
17
Bitmap bitmap = BitmapFactory.decodeResource(getResources(), R.drawable.test);
File file = new File(getFilesDir(),"test.jpg");
if(file.exists()){
file.delete();
}
try {
FileOutputStream outputStream=new FileOutputStream(file);
bitmap.compress(Bitmap.CompressFormat.JPEG,90,outputStream);
outputStream.flush();
outputStream.close();
} catch (FileNotFoundException e) {
e.printStackTrace();
} catch (IOException e) {
e.printStackTrace();
}
//释放bitmap的资源,这是一个不可逆转的操作
bitmap.recycle();

图片压缩

1
2
3
4
5
6
7
8
9
10
11
12
13
14
15
16
17
18
19
20
21
22
23
24
25
public static Bitmap compressImage(Bitmap image) {
if (image == null) {
return null;
}
ByteArrayOutputStream baos = null;
try {
baos = new ByteArrayOutputStream();
image.compress(Bitmap.CompressFormat.JPEG, 100, baos);
byte[] bytes = baos.toByteArray();
ByteArrayInputStream isBm = new ByteArrayInputStream(bytes);
Bitmap bitmap = BitmapFactory.decodeStream(isBm);
return bitmap;
} catch (OutOfMemoryError e) {
e.printStackTrace();
} finally {
try {
if (baos != null) {
baos.close();
}
} catch (IOException e) {
e.printStackTrace();
}
}
return null;
}

BitmapFactory

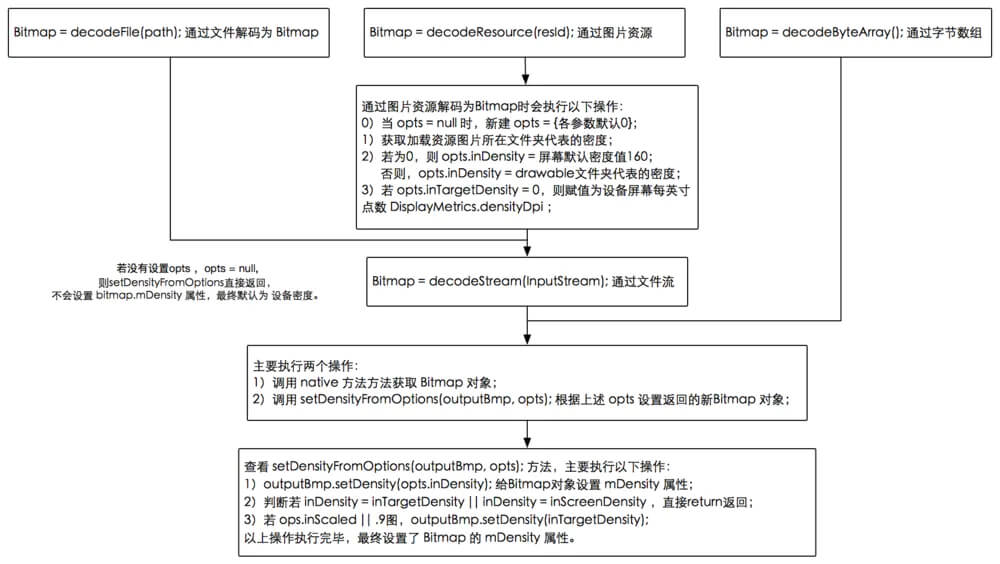
Bitmap创建流程

安卓/Bitmap创建流程

Option类

常用方法 说明
boolean inJustDecodeBounds 如果设置为true,不获取图片,不分配内存,但会返回图片的高度宽度信息
int inSampleSize 图片缩放的倍数
int outWidth 获取图片的宽度值
int outHeight 获取图片的高度值
int inDensity 用于位图的像素压缩比
int inTargetDensity 用于目标位图的像素压缩比(要生成的位图)
byte[] inTempStorage 创建临时文件,将图片存储
boolean inScaled 设置为true时进行图片压缩,从inDensity到inTargetDensity
boolean inDither 如果为true,解码器尝试抖动解码
Bitmap.Config inPreferredConfig 设置解码器这个值是设置色彩模式,默认值是ARGB_8888,在这个模式下,一个像素点占用4bytes空间,一般对透明度不做要求的话,一般采用RGB_565模式,这个模式下一个像素点占用2bytes
String outMimeType 设置解码图像
boolean inPurgeable 当存储Pixel的内存空间在系统内存不足时是否可以被回收
boolean inInputShareable inPurgeable为true情况下才生效,是否可以共享一个InputStream
boolean inPreferQualityOverSpeed 为true则优先保证Bitmap质量其次是解码速度
boolean inMutable 配置Bitmap是否可以更改,比如:在Bitmap上隔几个像素加一条线段
int inScreenDensity 当前屏幕的像素密度

基本使用

1
2
3
4
5
6
7
8
9
10
11
12
13
14
15
16
17
18
19
20
21
22
23
24
25
try {
FileInputStream fis = new FileInputStream(filePath);
BitmapFactory.Options options = new BitmapFactory.Options();
options.inJustDecodeBounds = true;
// 设置inJustDecodeBounds为true后,再使用decodeFile()等方法,并不会真正的分配空间,即解码出来的Bitmap为null,但是可计算出原始图片的宽度和高度,即options.outWidth和options.outHeight
BitmapFactory.decodeFileDescriptor(fis.getFD(), null, options);
float srcWidth = options.outWidth;
float srcHeight = options.outHeight;
int inSampleSize = 1;

if (srcHeight > height || srcWidth > width) {
if (srcWidth > srcHeight) {
inSampleSize = Math.round(srcHeight / height);
} else {
inSampleSize = Math.round(srcWidth / width);
}
}

options.inJustDecodeBounds = false;
options.inSampleSize = inSampleSize;

return BitmapFactory.decodeFileDescriptor(fis.getFD(), null, options);
} catch (Exception e) {
e.printStackTrace();
}

内存回收

1
2
3
4
5
if(bitmap != null && !bitmap.isRecycled()){ 
// 回收并且置为null
bitmap.recycle();
bitmap = null;
}

Bitmap类的构造方法都是私有的,所以开发者不能直接new出一个Bitmap对象,只能通过BitmapFactory类的各种静态方法来实例化一个Bitmap。仔细查看BitmapFactory的源代码可以看到,生成Bitmap对象最终都是通过JNI调用方式实现的。所以,加载Bitmap到内存里以后,是包含两部分内存区域的。简单的说,一部分是Java部分的,一部分是C部分的。这个Bitmap对象是由Java部分分配的,不用的时候系统就会自动回收了,但是那个对应的C可用的内存区域,虚拟机是不能直接回收的,这个只能调用底层的功能释放。所以需要调用recycle()方法来释放C部分的内存。从Bitmap类的源代码也可以看到,recycle()方法里也的确是调用了JNI方法了的。

相关链接

安卓自定义View进阶-Canvas之图片文字

防重复点击

  • 法1

    1
    2
    3
    4
    5
    6
    7
    8
    9
    10
    11
    12
    13
    14
    15
    16
    17
    18
    19
    20
    21
    22
    public class FastClickAvoider {

    private long lastClickTime;
    private long timeSpace = 500;

    public FastClickAvoider(){
    super();
    }

    public FastClickAvoider(long timeSpace){
    this.timeSpace = timeSpace;
    }

    public synchronized boolean isFastClick() {
    long time = System.currentTimeMillis();
    if (time - lastClickTime < timeSpace) {
    return true;
    }
    lastClickTime = time;
    return false;
    }
    }

    使用

    1
    2
    3
    4
    5
    6
    7
    8
    9
    10
    11
    protected FastClickAvoider fastClickAvoider;

    //自定义控件的构造函数或者BaseActivity的onCreate中实例化
    if (fastClickAvoider == null) {
    fastClickAvoider = new FastClickAvoider();
    }

    //在点击事件中调用
    if (fastClickAvoider != null && !fastClickAvoider.isFastClick()) {
    //do Something
    }

制作vector

  1. 下载软件Vector Magic 。如破解版
  2. 解压它,然后根据步骤进行破解
  3. 使用:
    1. 用上面的软件保存“svg”类型的文件
    2. 打开 http://inloop.github.io/svg2android/ 把上一步生成好的一个或多个svg文件拖入,然后下载下来
    3. 将下载好的xml文件放入安卓项目的 res/drawable

inflate

Android inflate的三种用法

inflate是用来把XML定义好的布局找出来,inflate之后并没有直接显示,需要再加入到其他布局当中才能显示,以下是inflate的三种使用方式:

  1. 使用LayoutInflater.inflate方法
  2. 使用context.getSystemService方法
  3. 使用View.inflate方法
1
2
3
4
5
6
7
8
9
10
11
12
13
14
15
16
17
18
19
20
21
22
//方法3:使用View.inflate方法
private void inflate3(){
LinearLayout sub = (LinearLayout) View.inflate(this, R.layout.my_layout, null);
LinearLayout layout = (LinearLayout) findViewById(R.id.activity_main);
layout.addView(sub);
}

//方法2:使用context.getSystemService方法
private void inflate2(){
LayoutInflater inflater = (LayoutInflater) this.getSystemServe(Context.LAYOUT_INFLATER_SERVICE);
LinearLayout sub = (Sub) inflater.inflate(R.layout.my_layout, null);
LinearLayout layout = (LinearLayout) findViewById(R.id.activity_main);
layout.addView(sub);
}

//方法1:使用LayoutInflater.inflater方法
private void inflate1(){
LayoutInflater inflater = LayoutInflater.from(this);
LinearLayout sub = (LinearLayout) inflater.inflate(R.layout.my_layout, null);
LinearLayout layout = (LinearLayout) findViewById(R.id.activity_main);
layout.addView(sub);
}

LayoutInflater.inflate()详解

结论:推荐使用
inflater.inflate(R.layout.item, parent, false);

构造方法可转成四个方法

1
2
3
4
inflater.inflate(R.layout.item, null, true);
inflater.inflate(R.layout.item, null, false);
inflater.inflate(R.layout.item, parent, true);
inflater.inflate(R.layout.item, parent, false);
  • 第一个参数:想要添加的布局

  • 第二个参数:想要添加到哪个布局上面

    为null则第三个参数无效,第一个参数中最外层的布局大小无效

  • 第三个参数:是否直接添加到第二个参数布局上面

    为true:layout文件会默认调addView添加到parent中;

    为false:以其他方式添加进parent中。

例子:

Activity布局(parent)

1
2
3
4
5
6
7
<?xml version="1.0" encoding="utf-8"?>
<RelativeLayout xmlns:android="http://schemas.android.com/apk/res/android"
android:id="@+id/rl"
android:layout_width="match_parent"
android:layout_height="match_parent">

</RelativeLayout>

要添加的布局layout.xml

1
2
3
4
5
6
7
8
9
10
11
12
<?xml version="1.0" encoding="utf-8"?>
<LinearLayout xmlns:android="http://schemas.android.com/apk/res/android"
android:layout_width="150dp"
android:layout_height="150dp"
android:background="#ff0000">

<Button
android:layout_width="wrap_content"
android:layout_height="wrap_content"
android:text="开开心心每一天" />

</LinearLayout>

使用:

1
2
3
4
5
6
7
8
9
@Override
protected void onCreate(Bundle savedInstanceState){
super.onCreate(savedInstanceState);
setContentView(R.layout.activity_main);
RelativeLayout rl = (RelativeLayout) findViewById(R.id.rl);
LayoutInflater inflater = LayoutInflater.from(this);
View view = inflater.inflate(R.layout.layout, rl, false);
rl.addView(view);
}

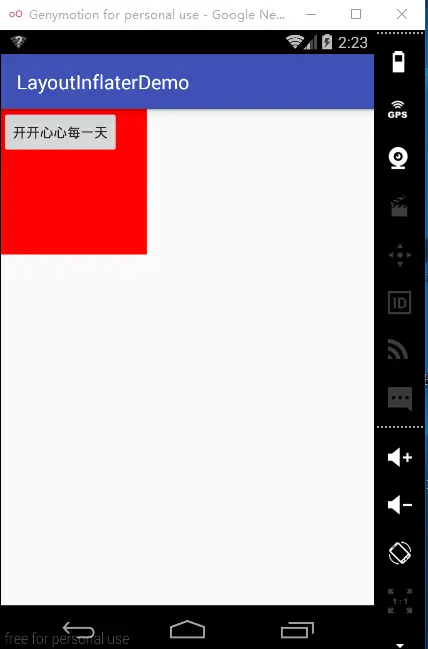
其中的inflater.inflate(R.layout.layout, rl, false);改成四种情况是:

  1. inflater.inflate(R.layout.layout, null, true);
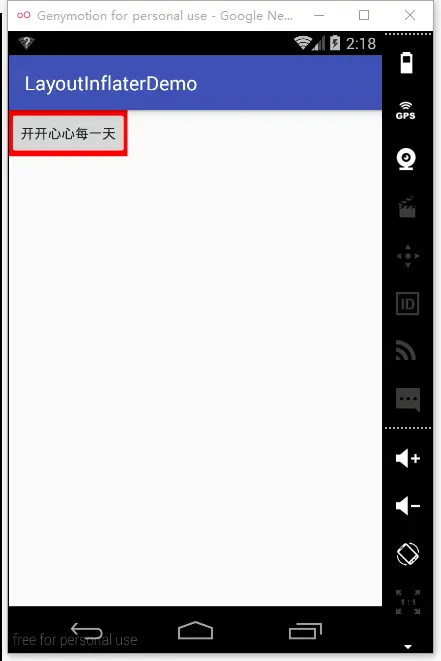
    img

  2. inflater.inflate(R.layout.layout, null, false);
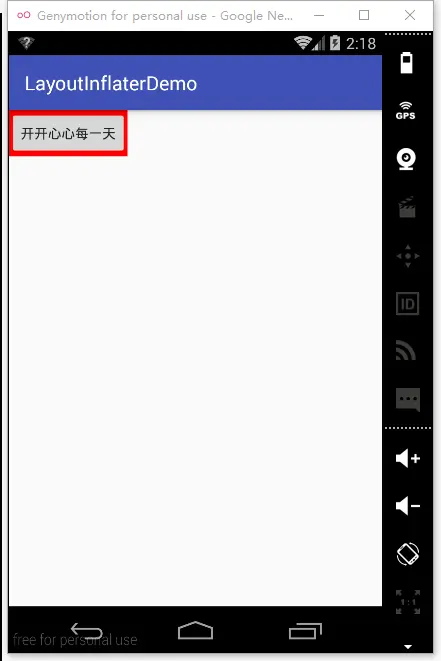
    img

  3. inflater.inflate(R.layout.layout, rl, true);

    这种情况不能再调用 addView 会报错(java.lang.IllegalStateException:The specified child already has a parent.Yout must call removeView() on the child's parent first.

    img

  4. inflater.inflate(R.layout.layout, rl, false);
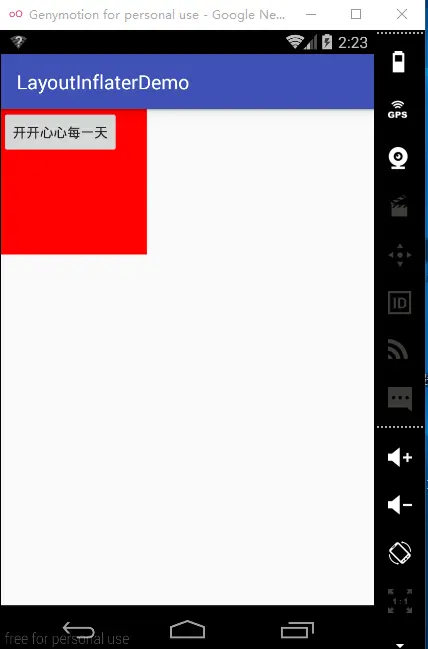
    img

tablayout

它有默认宽高:如果想要这个默认宽高不起效,加:

1
2
3
app:tabMaxWidth="0dp"
app:tabMinWidth="0dp"
app:tabMode="auto"

performClick 与 onCallClick

  1. API等级
    performClick是在API 1中加入
    callOnClick是在API 15 中加入

  2. 代码实现层面

    1
    2
    3
    4
    5
    6
    7
    8
    9
    10
    11
    12
    13
    14
    15
    16
    /**
    * Directly call any attached OnClickListener. Unlike {@link #performClick()},
    * this only calls the listener, and does not do any associated clicking
    * actions like reporting an accessibility event.
    *
    * @return True there was an assigned OnClickListener that was called, false
    * otherwise is returned.
    */
    public boolean callOnClick() {
    ListenerInfo li = mListenerInfo;
    if (li != null && li.mOnClickListener != null) {
    li.mOnClickListener.onClick(this);
    return true;
    }
    return false;
    }
    1
    2
    3
    4
    5
    6
    7
    8
    9
    10
    11
    12
    13
    14
    15
    16
    17
    18
    19
    20
    21
    22
    /**
    * Call this view's OnClickListener, if it is defined. Performs all normal
    * actions associated with clicking: reporting accessibility event, playing
    * a sound, etc.
    *
    * @return True there was an assigned OnClickListener that was called, false
    * otherwise is returned.
    */
    public boolean performClick() {
    final boolean result;
    final ListenerInfo li = mListenerInfo;
    if (li != null && li.mOnClickListener != null) {
    playSoundEffect(SoundEffectConstants.CLICK);
    li.mOnClickListener.onClick(this);
    result = true;
    } else {
    result = false;
    }

    sendAccessibilityEvent(AccessibilityEvent.TYPE_VIEW_CLICKED);
    return result;
    }

从代码中可以看出,callOnClick是performClick的简化版,不包含点击播放声音,不具有辅助功能,那么什么是辅助功能,给出官方介绍如下:

  许多Android用户有不同的能力(限制),这要求他们以不同的方式使用他们的Android设备。这些限制包括视力,肢体或与年龄有关,这些限制阻碍了他们看到或充分使用触摸屏,而用户的听力丧失,让他们可能无法感知声音信息和警报。
  Android提供了辅助功能的特性和服务帮助这些用户更容易的使用他们的设备,这些功能包括语音合成、触觉反馈、手势导航、轨迹球和方向键导航。Android应用程序开发人员可以利用这些服务,使他们的应用程序更贴近用户。