创建个人博客
使用hexo创建博客
参考链接
windows安装hexo(记得Add to Path这步要勾选install local...)
给自己用的:
(要换个新的电脑搭建,我自己的站点配置和主题配置已经改好)
- 运行以下命令
npm install hexo-cli -g
hexo -v
npm update hexo -g
hexo init
npm install –save hexo-deployer-git
npm install hexo-abbrlink –save
npm install hexo-excerpt –save
npm install crypto-js
npm install hexo-hide-posts –save
npm install hexo-wordcount
npm install hexo-generator-searchdb –save
npm uninstall hexo-generator-index –save
npm install hexo-generator-index-pin-top –save
npm install hexo-asset-image –save
npm i hexo-renderer-swig
npm install hexo-generator-index –save
npm install hexo-generator-archive –save
npm install hexo-generator-tag –save
npm install hexo-generator-category –savenpm install –save hexo-helper-live2d
再把.git、source、themes、_config.yml、.gitignore覆盖过来
hexo cl && hexo g && hexo s
hexo命令
安装、升级、初始化
1 | #升级npm【可选】 |
npm查看安装了哪些包
npm list --depth=0npm查看全局安装了哪些工具
npm list --depth --globalnpm查看某个模块是否安装了
npm list <packagename>
创建目录
1 | hexo new page "categories" |
创建新文件(在 source/_posts 下生成“文件名.md”文件)
1 | hexo n [layout] "文件名" #新建文章(也会创建文件夹) |
Run server(本地直接查看)(是建议步骤)
1 | hexo s |
本地生成静态网页
1 | hexo g |
发布到博客
1 | hexo d |
服务器
1 | hexo server #Hexo 会监视文件变动并自动更新,您无须重启服务器。 |
监视文件变动
1 | hexo generate #使用 Hexo 生成静态文件快速而且简单 |
完成后部署
1 | 两个命令的作用是相同的 |
1 | hexo deploy -g` |
草稿
1 | hexo publish [layout] |
hexo设置
以下设置仅供参考,因为使用的next主题的版本有升级过(有些设置不一样了)
添加本地搜索
next/_config.yml中打开搜索开关
1 | local_search: |
打开文章的资源文件夹功能
站点配置文件
1 | post_asset_folder: true # 默认值false,关闭文章资源文件夹功能 |
直接在markdown文章中写入:
1 | <img src="{asset_path full-image.jpg %}/>" |
增加支付宝和微信打赏功能
主题配置文件next/_config.yml
1 | reward_comment: 坚持原创,您的支持将鼓励我继续创作 |
打开themes\next\layout\_macro\reward.swig文件,修改打赏按钮和图片下方的文字
1 | # 改动1:把下方的Donate改为赏,对应打赏按钮 |
修正打赏说明文字闪动问题
打开themes\next\source\css\_common\components\post\post-reward.styl
1 | //#wechat:hover p{ |
设置网站博客肖像
主题配置文件next/_config.yml
1 | # Sidebar Avatar |
添加点击头像跳转到指定网址
themes/hexo-theme-next/source/js/src/motion.js的文章头部添加
1 | /* 点击头像,添加跳转的链接 */ |
头像边框改为圆形框
打开位于themes/next/source/css/_common/components/sidebar/下的sidebar-author.syl文件,修改如下
1 | .site-author-image { |
鼠标放置头像上旋转
打开位于themes/next/source/css/_common/components/sidebar/下的sidebar-author.syl文件,修改如下
1 | .site-author-image { |
设置页面动态背景
主题配置文件next/_config.yml
动态特效:该特效打开的是3条线段追踪鼠标
1 | # Canvas-nest |
3D特效:该特效由三维js库提供的三维动态背景
1 | # three_waves |
线条特效:该开关的打开,在背景上显示较长线条及小球。
1 | canvas_lines: false |
球状特效:该开关在背景上显示一个球状图案。
1 | canvas_sphere: true |
特别注意,上述四种特效,可以独立设置,也可以叠加
设置网站缩略图标
主题配置文件next/_config.yml
1 | favicon: |
建议采用ico格式的缩略图,其他图可能存在兼容性问题
去掉文章目录标题的自动编号
主题配置文件next/_config.yml
1 | toc: |
自定义头部区域背景图
在Prisse Theme中,是不是清一色的黑色让你非常不爽啊,我也不爽。 我想要一个不一样的的效果,比如在加一个背景图片。我的副标题是“面朝大海,春乱花开”,我想来一张应景的图片。 找到如下themes\next\source\css\_custom\custom.styl 文件,添加
1 | .site-meta { |
hexo next去掉上方的黑线or改掉颜色
方法一:去掉黑线div
”
修改文件知“themes\next\layout_layout.swig”,道删除“
修改黑线高度为0方法二:修改黑线高度为0
修改文件“themes\next\source\css_variables\base.styl”,找到“$headband-height”,把3px改成0px;
1 | $headband-height = 0px |
代码上增加“复制”功能
- 在
themes\hexo-theme-next\layout\_third-party\下新建copy-code.swig
1 | {% if theme.codeblock.copy_button.enable %} |
- 在
themes\hexo-theme-next\layout\_layout.swig的</body>上一行添加
1 | {% include '_third-party/copy-code.swig' %} |
- 在
themes\hexo-theme-next\languages\zh-Hans.yml的post:下增加
1 | copy_button: 复制 |
在themes\hexo-theme-next\languages\en.yml的post:下增加
1 | copy_button: Copy |
- 在
themes\hexo-theme-next\_config.yml的font:跟之间增加1
2
3# ------
# Third Party Services Settings
# ------
1 | # Manual define the border radius in codeblock |
添加live2d卡通人物
- 安装
hexo-helper-live2d
1 | npm install --save hexo-helper-live2d |
- 安装
live2d
1 | npm install live2d-widget-model-wanko |
- 配置
next/_config.yml中添加
1 | # https://github.com/EYHN/hexo-helper-live2d |
重新hexo d -g即可看效果
给指定标签的文章加密
给文章加密,需要密码才能观看
next/layout/_partials/head.swing的<script></script>标签种添加方法
1 | (function(){ |
代码块主题更改
站点_config.yml打开代码高亮和自动识别语言的开关
1 | highlight: #代码块的设置,Hexo自带的代码高亮插件 |
主题配置文件_config.yml选择个主题
1 | #可选主题normal | night | night eighties | night blue | night bright |
优化文章(代码块)字体
themes/next/source/css/_variables/custom.styl添加内容
1 | // 标题,修改成你期望的字体族 |
设置社交网址和图标
themes/next/_config.yml
1 | social: |
去除底部 powerby
Next/_config.yml
1 | footer: |
修改copyright
感觉底部版权信息不够丰富,打算新增一些内容。
设置前的效果:
修改文件:themes/next/layout/_macro/post-copyright.swig
修改前:
修改后:
主要是新增了一些文字描述。
设置后的效果:
添加评论系统
leancloud网站:
- 创建个应用,名字随便起个,如:blog
- 存储–结构化数据–创建 Class:名字 Counter
- 设置–应用 Keys–这里面的 AppID 和 AppKey 要复制出来用
- 设置–安全中心:Web 安全域名填入
https://shenbh.top(coding 那也强制成 https)
打开 next/config.yml:
1 | # Valine. |
添加leancloud统计
Next /config.yml
1 | # Show number of visitors to each article. |
鼠标点击有心
- 添加文件
next/source/js/src/clicklove.js
1 | ! function(e, t, a) { |
next/layout/_layout.swing在</html>后添加如下
1 | <!-- 页面点击小红心 --> |
思维导图
使用:
1 | npm install hexo-simple-mindmap |
范例:
1 | {% pullquote mindmap mindmap-md %} |
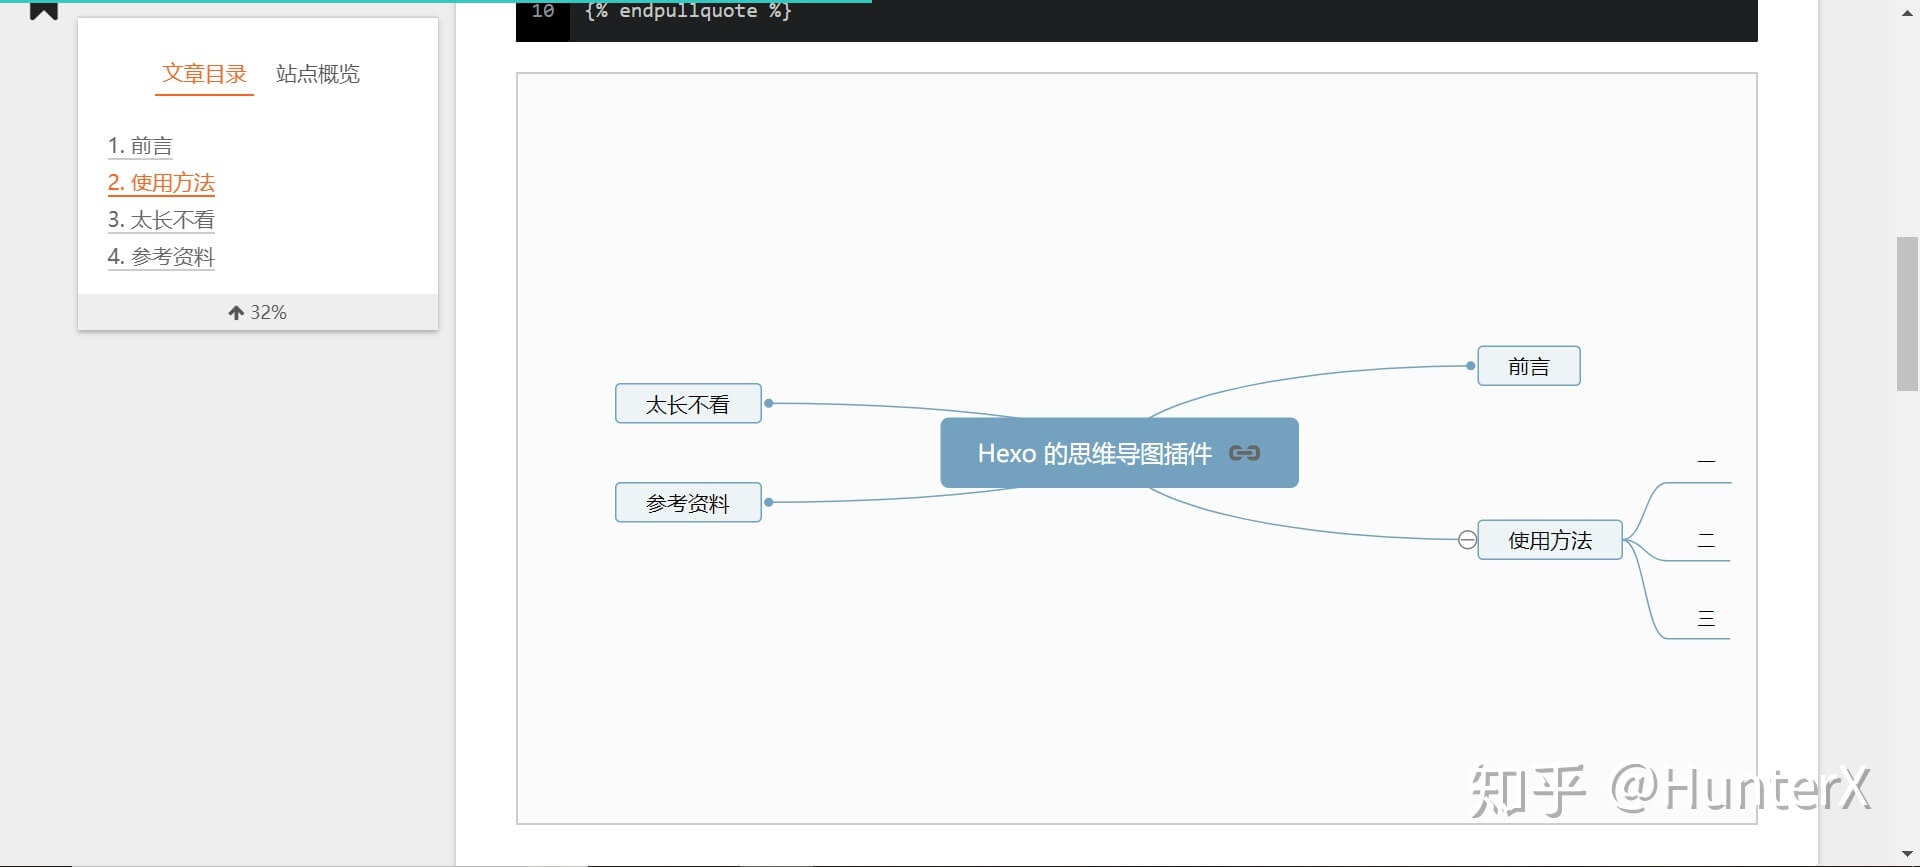
上面的在windows上试了不起效
添加记录访问ip
多级分类
让网站可被百度搜索
修改文章永久链接为随机编号
安装abbrlink插件
1
npm install hexo-abbrlink --save
编辑站点配置文件
1
2
3
4
5
6
permalink: posts/:abbrlink/
abbrlink:
alg: crc32
rep: dec重新生成部署
1
hexo cl
升级 Hexo 和 NexT 主题
查看hexo版本
1 | hexo version |
升级hexo版本
1 | npm upgrade |
升级next主题(目前最新版本7.8)
1 | cd themes/next |
更改配置:
更改站点配置文件的themes为刚刚的next
1
2
3
4
5
6# Extensions
## Plugins: https://hexo.io/plugins/
## Themes: https://hexo.io/themes/
# git clone https://github.com/theme-next/hexo-theme-next themes/next
theme: next
# theme: next-5.1.4站点的language更改成
language:zh-CN(原来的是themes\next\language\zh-Hans.yml文件,现在是zh-CN.yml文件)首页内容全部展示出来,没有“查看更多”按钮
1
npm install hexo-excerpt --save
在站点配置文件添加
1
2
3
4
5excerpt:
depth: 5
excerpt_excludes: []
more_excludes: []
hideWholePostExcerpts: true主题配置文件设置
1
2excerpt_description: true
read_more_btn: true下载本地搜索插件
1
npm install hexo-generator-searchdb --save
设置字数统计和预计阅读时间
1
npm install hexo-symbols-count-time --save
站点配置文件添加
1
2
3
4
5symbols_count_time:
symbols: true # 文章字数统计
time: true # 文章阅读时长
total_symbols: true # 站点总字数统计
total_time: true # 站点总阅读时长主题配置文件
1
2
3
4
5
6# Post wordcount display settings
# Dependencies: https://github.com/theme-next/hexo-symbols-count-time
symbols_count_time:
separated_meta: true
item_text_post: true
item_text_total: false
设置首页显示摘要和阅读原文按钮
next/_config.yml中
1 | auto_excerpt: |
指定文章加密
- 指定文章的tags中添加
private会加密 - 指定文章(与tags同级)添加
hide: true,首页、分类页、归档页会隐藏此文章
- 安装插件
1 | npm install crypto-js |
- 站点配置文件中添加
1 | encrypt: |
- 主题目录下
scripts文件夹下,新建encrypt.js文件,内容
1 | const CryptoJS = require('crypto-js'); |
1 | npm install hexo-hide-posts --save |
在站点目录下的_config.yml中如下配置:
1 | # hexo-hide-posts |
要隐藏的文章的头部添加hide:true
如:
1 |
|
列出隐藏的文章(cmd窗口中输入以下内容)
1 | hexo hidden:list |
让文章能置顶
安装插件
1
2npm uninstall hexo-generator-index --save
npm install hexo-generator-index-pin-top --save对应的文章的开头加入
top: true1
2
3
4
5
6
7
title: Hexo Next主题设置文章置顶
date: 2020-01-03 17:26:01
categories: Hexo
tags: Next主题
top: true设置置顶标志
打开**
\themes\next\layout\_macro\post.swig**找到
<div class="post-meta">下面插入一下代码:1
2
3
4
5{% if post.top %}
<i class="fa fa-thumb-tack"></i>
<font color="RED">置顶</font>
<span class="post-meta-divider">|</span>
{% endif %}
更改页面宽度
列出Pisces Scheme的修改方式
打开/Hexo/themes/hexo-theme-next/source/css/_variables/custom.styl 添加两行代码即可
1 |
渲染跳过
方法一:在顶部模块内添加layout: false
方法二:站点配置文件_config.yml中,找到skip_render,做如下修改:
1 | skip_render: |
最后执行hexo clean和hexo s -g 本地预览,检查无误后hexo g -d部署到服务器上即可。
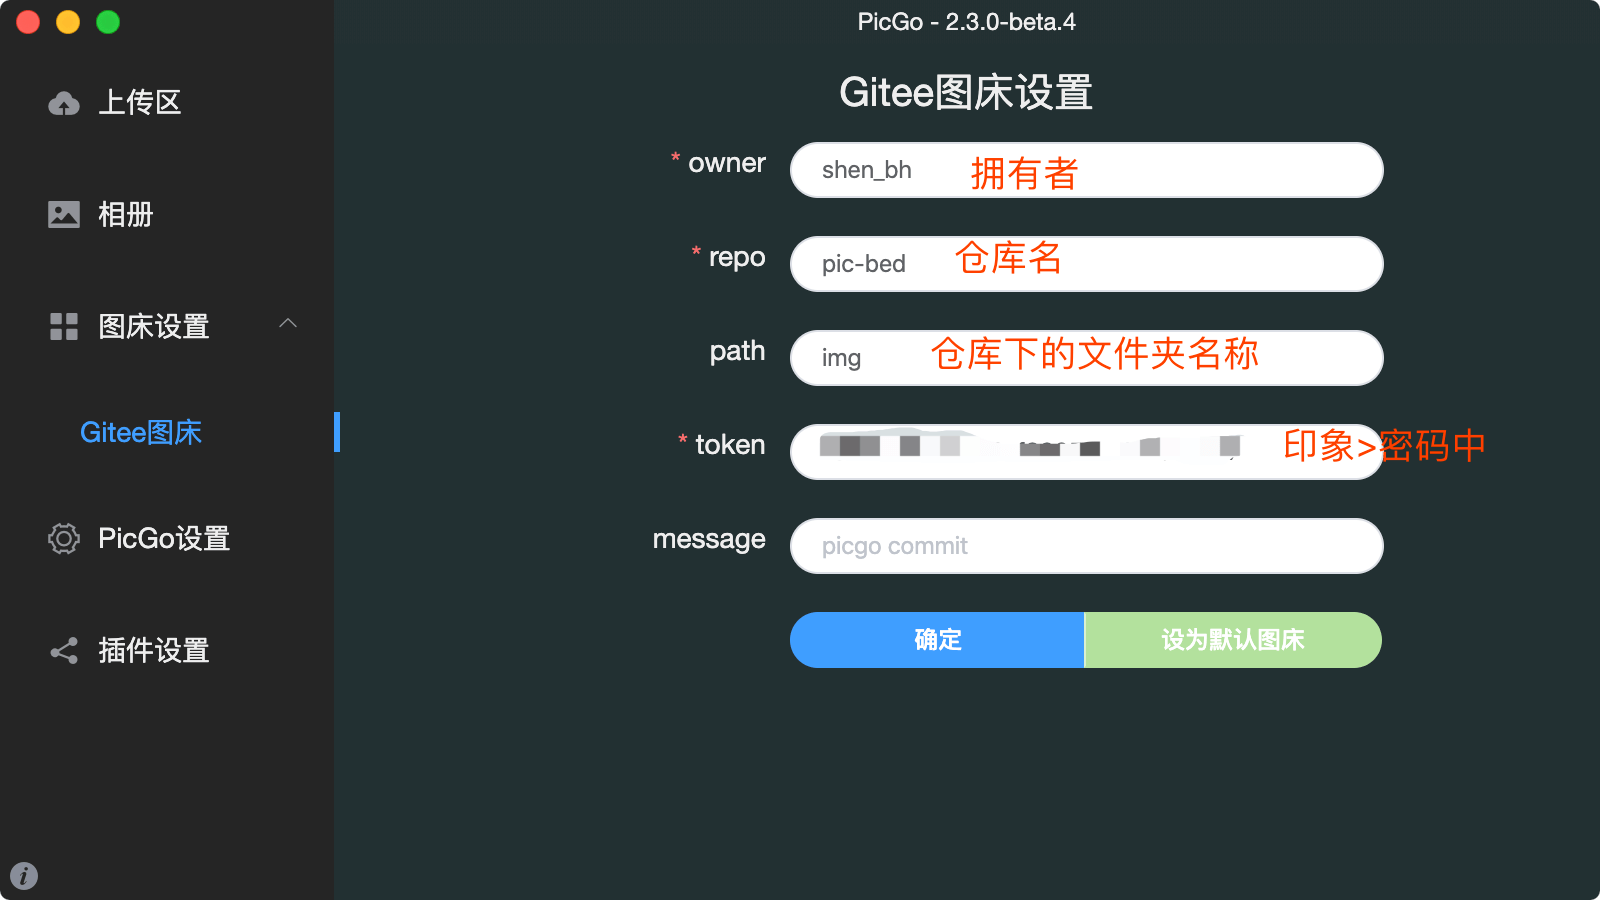
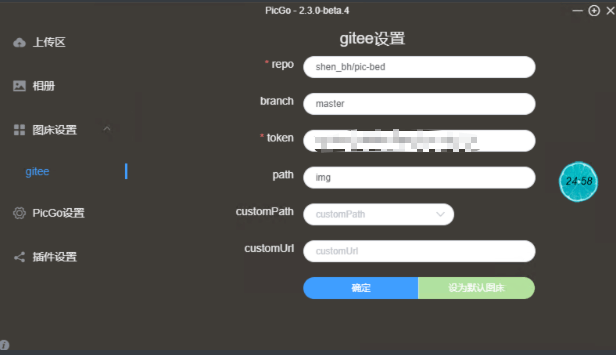
picgo+gitee 做图床

注意点
- 所有文章都在 source/_posts 下
hexo g生成的 (在public目录下) 静态页面可以拷贝出来放到自己服务器展示- 首页显示文章列表(带部分内容预览)的做法:
- 方法一:在文章需要“截断”的位置加上
<!-- more --> - 方法二:在主题 themes/next下的_config.yml 最后一行加上
1
2
3
4
5-# Automatically excerpt (Not recommend).
-# Use <!-- more --> in the post to control excerpt accurately.
-# 从NexT 7.6.0开始,NexT取消了首页预览设置,得用 <!-- more --> auto_excerpt:
enable: true ##打开文章折叠开关
length: 150 ##指定预览内容长度
- 方法一:在文章需要“截断”的位置加上
- 文章头部可以指定本文所属的分类(categories)、标签(tags)
遇到问题
git@git.coding.net: Permission denied (publickey)
问题:hexo d发布时报上面的错误,打开coding的个人设置–SSH公钥:新增,提示已经存在(但实际没有公钥)
解决:打开blog仓库,代码仓库–仓库设置–重置代码仓库。再去个人设置中添加SSH公钥,添加成功了。所以应该这样就可以解决问题了。
参考链接:https://blog.csdn.net/qq_36667170/article/details/100894172
menu图标显示成问号
1 | menu: |
上面的menu的每项后要加 ||别名(对应底下的menu_icons内的名称)
menu点击后跳转,报”Cannot GET /%20/“
- 安装对应的插件
Hexo在生成静态页的时候,需要使用对应的插件:
1 | hexo-generator-index #生成首页 |
对应安装命令:
1 | npm install hexo-generator-index --save |
- next/_config.yml中menu下的||前后多了空格,去掉空格即可
如:
1 | menu: |
Cannot GET /archives/%7C%7Carchive
打开next/layout/_macro/sidebar.swig
找到<a href="{{ url_for(theme.menu.archives).split('||')[0] | trim }}">
更改成<a href="{{ url_for(theme.menu.archives.split('||')[0] | trim) }}">
点首页等的时候链接自动带上了%20
解决:主题的_config.yml的menu中的斜杠后的空格要去掉。如home: / || home改成home: /|| home
分页按钮(向左向右箭头显示异常的问题)
修改代码的位置: themes\next\layout\_partials\pagination.swig
原来为:
1 | {% if page.prev or page.next %} |
修改为:
1 | {% if page.prev or page.next %} |
busuanzi_count只显示图标不显示具体值
hexo-theme-next主题中使用了dn-lbstatics.qbox.me域名的文件位置为:themes\next\layout\_third-party\analytics\busuanzi-counter.swig
修改busuanzi-counter.swig
1 | 找到如下代码: |
hexo s或hexo d 后在网页上无法正常显示
问题:
1 | 网页上显示: |
解决:hexo在5.0之后需要再安装个东西
1 | npm i hexo-renderer-swig |
hexo d部署的时候提示权限不足 Please make sure you have the correct access rights。。。
解决:打开coding.net(部署的仓库),找到项目,找到部署公钥,添加公钥(把本地 id_rsa.pub 的内容添加到网站上)
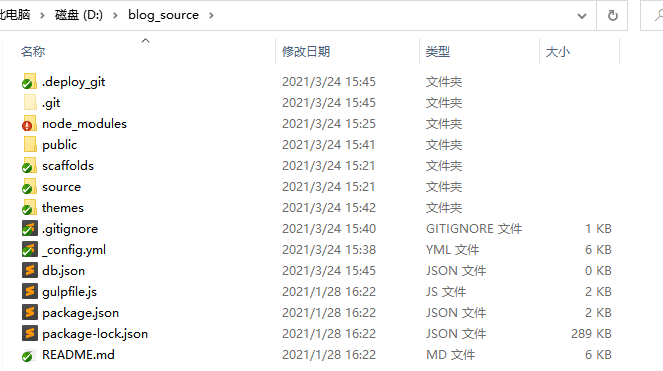
ERROR Cannot find module ‘hexo’ from ‘D:\blog_source’
问题:
1 | hexo clean |
解决:
切换到blog_source目录,重新安装
1 | npm install hexo -g #安装 |
部署到github上后访问不了
问题:访问 https://shenbh.github.io 拒绝了我们的连接请求
查询git博客地址的ip,输入“shenbh.github.io”,搜到的结果为:
1
2
3
4
5
6
7
8
9185.199.110.153 [美国 GitHub+Fastly节点]
185.199.109.153 [美国 GitHub+Fastly节点]
185.199.108.153 [美国 GitHub+Fastly节点]
185.199.111.153 [美国 GitHub+Fastly节点]
185.199.111.153 [美国 GitHub+Fastly节点]
185.199.109.153 [美国 GitHub+Fastly节点]
185.199.108.153 [美国 GitHub+Fastly节点]
185.199.110.153 [美国 GitHub+Fastly节点]把上述内容更改成以下内容,贴到hosts文件中(“C:\Windows\System32\drivers\etc\hosts”)
1
2
3
4
5
6
7
8
9#github.io
185.199.111.153 shenbh.github.io
185.199.110.153 shenbh.github.io
185.199.109.153 shenbh.github.io
185.199.108.153 shenbh.github.io
185.199.108.153 shenbh.github.io
185.199.111.153 shenbh.github.io
185.199.109.153 shenbh.github.io
185.199.110.153 shenbh.github.io
在dos窗口输入ipconfig /flushdns来刷新dns解析缓存
最终hosts内容
1 | # For example: |
Error: Cannot find module './db.json'
解决:把node-modules删除之后重装
首页最底部的向右箭头显示成<i class="fa fa-angle-right"></i>
打开next > layout > _partials > pagination.swig把错误代码改成“上一页”、“下一页”即可
Unable to call symbolsCount, which is undefined or falsey
1 | npm install hexo-symbols-count-time --save |
新版next主题没有了auto excerpt
- 在网站根目录下运行
1 | npm install hexo-excerpt --save |
- 在站点配置文件里添加
1 | excerpt: |
- 主题配置文件里设置
1 | excerpt_description: true |
在某个文章上,再点搜索到的结果,出现的新链接带俩posts的问题
npm list --depth=0
查看到是安装的 hexo-generator-search@2.4.2
解决:
- 卸载这个search插件:
npm uninstall hexo-generator-search - 安装另一个search插件:
npm install hexo-generator-searchdb --save
PS:记得
next的_config.yml中打开local search的开关
2
3
4
5
6
7
8
9
10
11
12
13
# Dependencies: https://github.com/theme-next/hexo-generator-searchdb
local_search:
  enable: true
# If auto, trigger search by changing input.
# If manual, trigger search by pressing enter key or search button.
trigger: auto
# Show top n results per article, show all results by setting to -1
top_n_per_article: 1
# Unescape html strings to the readable one.
unescape: false
# Preload the search data when the page loads.
preload: true
加载本地图片不正常
安装插件 npm install hexo-asset-image --save之后图片还显示不出来,打开/node_modules/hexo-asset-image/index.js替换成如下内容:
之后本地与文章在同一目录下,且图片的文件夹名称是文章的名称
1 | ; |
然后需要重新生成hexo cl && hexo g
文章中图片的相对路径需要使用./开头,比如

Error: Cannot find module ‘....\package.json’
简述:就是重新clone这个next主题下来,然后具体配置自己再改下。。
Deployer not found: [35mbaidu_url_submitter
因为我不用百度推送,所以检查站点配置_config.yml,注释掉type: baidu_url_submitter
个人服务器上部署博客
需要购买ECS服务器,点击领取优惠券
用docsify创建博客
相关教程
一些资源
主题:https://github.com/docsifyjs/awesome-docsify
切换国内镜像源
1 | npm config set registry https://registry.npm.taobao.org/ |
docsify 官方 源码
docsify 官方API
初始化
安装docsify-cli
1
npm i docsify-cli -g
项目初始化
我这边从git上clone下来了(路径:D:\docsify),包含了初始化后的文件,所以这步跳过
启动docsify
cmd中cd到
D:\docsify1
docsify serve ./
在浏览器中输入
http://localhost:3000/即可查看
YankNote笔记设置
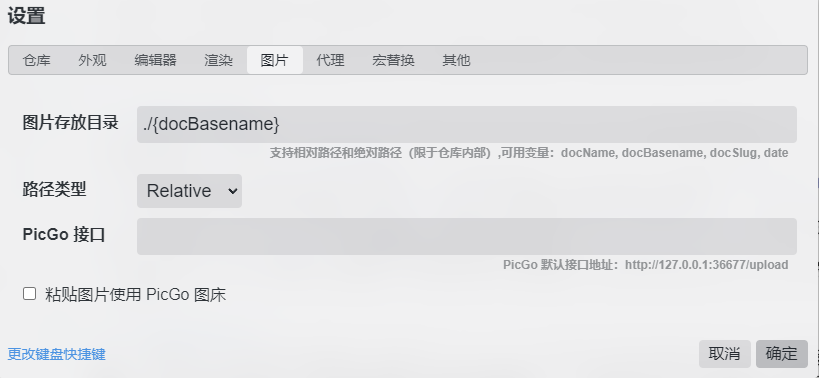
图片设置: