屏幕适配
概念
- 像素(pixel):简写px
- 分辨率:横纵方向上的像素个数
- 屏幕尺寸:对角线长度(单位英寸)
- dip(density independent pixel):抽象意义上的像素。简写dp
- dpi(dot per inch):像素密度,简称密度(即每英寸的像素数)。dpi=(√(xx+yy))/对角线英寸 标准dpi=160
- density:是个比例数,单位:像素/英寸。density=dpi/(标准dpi/英寸)=dpi/(160/英寸)
单位
dpi
每英寸像素数(dot per inch)dp
密度无关像素 - 一种基于屏幕物理密度的抽象单元。 这些单位相对于160 dpi的屏幕,因此一个dp是160 dpi屏幕上的一个px。 dp与像素的比率将随着屏幕密度而变化,但不一定成正比。为不同设备的UI元素的实际大小提供了一致性。
sp
与比例无关的像素 - 这与dp单位类似,但它也可以通过用户的字体大小首选项进行缩放。建议在指定字体大小时使用此单位,以便根据屏幕密度和用户偏好调整它们。1
2
3
4
5dpi = px / inch
density = dpi / 160
dp = px / density
=> px = dp * (dpi/160)
| drawable后名称 | – | dpi值 | 换算 | 对应 ios |
|---|---|---|---|---|
| 不带后缀 | –> | 160dpi | 1dp=1px | – |
| ldpi | –> | 120dpi | 1dp=0.75px | @1x |
| mdpi | –> | 160dpi | 1dp=1px | – |
| hdpi | –> | 240dpi | 1dp=1.5px | – |
| xhdpi | –> | 320dpi | 1dp=2px | @2x |
| xxhdpi | –> | 480dpi | 1dp=3px | @3x |
| xxxhdpi | –> | 640dpi | 1dp=4px | – |
| tvdpi | –> | 213dpi |
| 密度限定符 | 说明 |
|---|---|
ldpi |
适用于低密度 (ldpi) 屏幕 (~ 120dpi) 的资源。 |
mdpi |
适用于中密度 (mdpi) 屏幕 (~ 160dpi) 的资源(这是基准密度)。 |
hdpi |
适用于高密度 (hdpi) 屏幕 (~ 240dpi) 的资源。 |
xhdpi |
适用于加高 (xhdpi) 密度屏幕 (~ 320dpi) 的资源。 |
xxhdpi |
适用于超超高密度 (xxhdpi) 屏幕 (~ 480dpi) 的资源。 |
xxxhdpi |
适用于超超超高密度 (xxxhdpi) 屏幕 (~ 640dpi) 的资源。 |
nodpi |
适用于所有密度的资源。这些是与密度无关的资源。无论当前屏幕的密度是多少,系统都不会缩放以此限定符标记的资源。 |
tvdpi |
适用于密度介于 mdpi 和 hdpi 之间的屏幕(约 213dpi)的资源。这不属于“主要”密度组。它主要用于电视,而大多数应用都不需要它。对于大多数应用而言,提供 mdpi 和 hdpi 资源便已足够,系统将视情况对其进行缩放。如果您发现有必要提供 tvdpi 资源,应按一个系数来确定其大小,即 1.33*mdpi。例如,如果某张图片在 mdpi 屏幕上的大小为 100px x 100px,那么它在 tvdpi 屏幕上的大小应该为 133px x 133px。 |
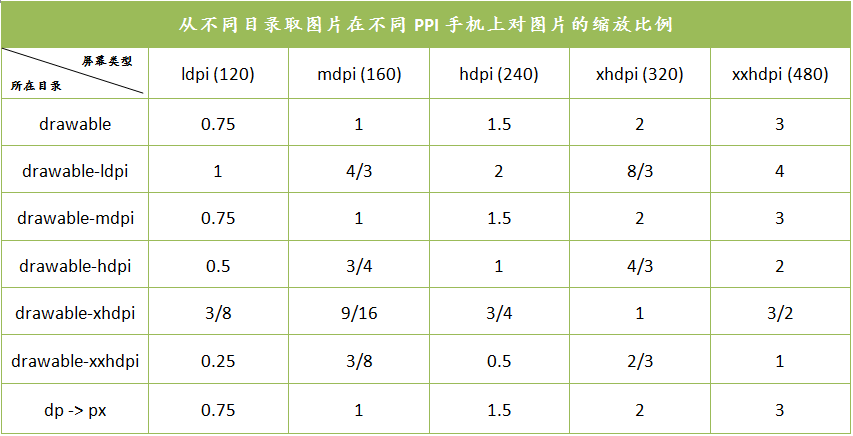
drawable的适配机制是,系统会先到后缀与设备匹配的drawable目录下找对应的图片,当找不到的时候会去‘更高’一级的目录去找,再找不到,继续
往高一级的找,再找不到就退而求其次去低一级的找,依次类推。
例如:在密度为xxhdpi的手机上运行app,会去drawable-xxhdpi目录下找图片资源,找不到就去drawable-xxxhdpi找,如果没有比drawable-xxxhdpi更高的,则再找不到就去drawable-xhdpi找,再找不到就去drawable-hdpi找,直到找到对应的图片资源,当找到后,系统会按密度对图片做缩放处理,然后再显示到屏幕上,所以如果图片放的目录不对的话,有可能造成图片模糊。layout-land-1024x720,layout-1280x720,layout-1920x1080
layout目录的适配机制是,从“高往低”找最接近的尺寸目录,例如手机是1920x1080分辨率的,但是如果无此layout目录那么便会低一级的layout-1280x720找布局(而不会去高一级的layout-2560x1440找),依次类推,直至找到layout不带后缀的目录为止,如果还没有,就会报错。
所以考虑以下场景:
原本我们的布局文件目录只有layout一个,没有其他带后缀的layout目录
实际测试中发现的布局在960x540手机上有问题。
那么有些人可能会想到加个layout-960x540目录,然后在此目录下做特殊处理。那么问题来了,加了这个目录之后,layout目录就有两个,layout无后缀和layout-960x540。当在1920x1080手机上运行程序时,按照适配机制,系统会使用layout-960x540目录下的布局文件,而我们当初的初衷是只希望layout-960x540目录下的布局文件在960x540的手机上使用,所以这种情况下布局肯定会有问题。注意:因此,千万注意上面这种场景,不要随意添加‘layout-分辨率’的这种目录,除非把各种主流分辨率都添加一遍。碰到这种问题,最好从dimens文件入手做适配。
values目录之dimens文件,为了适配不同尺寸的手机,我们可以创建多个values目录,然后在其中定义dimens尺寸,例如values-1280x720,values-1196x720等等。
dimens适配的机制是,先找跟设备对应的values目录下的dimens文件中的尺寸定义,找不到则往低一级的找,比如,在1280x720分辨率的手机上,如果app中没有创建values-1280x720目录,而只有values-1920x1080、values-1196x720目录和默认的values目录,那么系统会去优先去values-1196x720的目录下找对应的尺寸。如果找不到,则去默认的values找,再找不到就报错(不会去1920x1080目录找)。
总结:
- drawable适配过程:找与设备密度对应的目录下的图片—>往更高质量的找—>退而求其次找低质量的
- layout适配过程:找与设备对应的目录,找不到则从比设备分辨率低一级的目录开始依次往下找。
- values适配过程:同layout。
^cb47f9
- 自动拉伸位图,即android下特有的
.9.png图片格式。
当我们需要使图片在拉伸后还能保持一定的显示效果,比如,不能使图片中的重要像素拉伸,不能使内容区域受到拉伸的影响,我们就可以使用.9.png图来实现。
主流分辨率启动图
480*800
1 | drawable |
注意:建立layout-xxxx的时是“大分辨率x小分辨率”,比如layout-1280x720。drawable也是。
drawable-xxhdpi和drawable-1920x1080同时存在,最终取的是drawable-xxhdpi的图片
drawable文件夹和屏幕密度(ppi)对应关系
| drawable | ldpi | mdpi | hdpi | xhdpi | xxhdpi | xxxhdpi |
|---|---|---|---|---|---|---|
| 1 | 0.75 | 1 | 1.5 | 2 | 3 | 4 |
以mdpi为基准,相同切图,hdpi文件夹里的图应该是mdpi的1.5倍,xhdpi文件夹里的图应该是mdpi的2倍,以此类推,只有根据这个比例来放切图,在不同分辨率手机上展示才会相对协调。
查看手机是xhdpi还是xxhdpi
windows:
mac:
常见品牌手机相关参数(2014年数据)
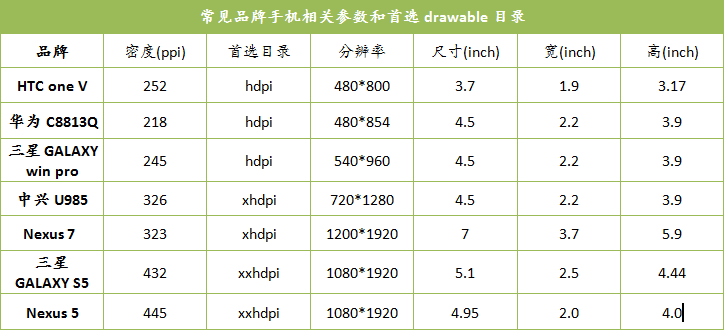
我的最终分辨率文件夹
- drawable-xxxhdpi(放1080x2340)
- drawable-xxhdpi(放1080x1920)
- drawable-xhdpi(放720x1080)
- drawable-hdpi(放480x800)
- drawable-mdpi(放320x480)
values-vxx
value-v14 是API14以上会取这个文件夹的
value-v11 是API11~API14会取这个文件夹的(如果存在value-v14的情况下)
头条适配方案
1 | private static void setCustomDensity( Activity activity, final Application application) { |
基于头条屏幕方案的 AndroidAutoSize
在
项目根目录/build.gradle(新版gradle是在settings.gradle中)添加1
2
3
4
5
6allprojects {
repositories {
//...
maven { url "https://jitpack.io" }
}
}在
module/build.gradle1
implementation 'com.github.JessYanCoding:AndroidAutoSize:v1.2.1'
在
module/AndroidManifest.xml下增加这里用
375*667dp作为尺寸单位1
2
3
4
5
6
7
8
9
10<manifest>
<application>
<meta-data
android:name="design_width_in_dp"
android:value="375"/>
<meta-data
android:name="design_height_in_dp"
android:value="667"/>
</application>
</manifest>默认是用宽度来适配的,若要用高度来适配的话需要在自定义的 Application 中进行(全局设置)or 在单个 Activity 中进行(局部设置)
1
2
3
4
5
6
7class App: Application(){
override fun onCreate(){
super.onCreate()
//默认使用宽度适配
AutoSizeConfig.getInstance().isBaseOnWidth = false //false 改成用高度适配
}
}特定Activity使用适配
1
2
3
4
5
6
7
8
9
10
11
12
13
14
15
16class HeightActivity: AppCompatActivity(), CustomAdapt{
//取消以宽度为基准进行适配
override fun isBaseOnWidth():Boolean{
return false
}
//返回高度的单位尺寸
override fun getSizeInDp():Float{
return 640f
}
override fun onCreate(savedInstanceState:Bundle?){
super.onCreate(savedInstanceState)
setContentView(R.layout.activity_height)
}
}特定Activity放弃适配
1
public class CancelAdaptActivity extends AppCompatActivity implements CancelAdapt{}
特定Fragment使用适配
- 在app初始化时开启对Fragment的支持
1
AutoSizeConfig.getInstance().setCustomFragment(true);
- 实现CustomAdapt
1
2
3
4
5
6
7
8
9
10
11
12
13
14
15
16public class CustomAdaptFragment extends Fragemnt implements CustomAdapt{
public boolean isBaseOnWidth(){
return false;
}
public float getSizeInDp90{
return 667;
}
}
取消自定义适配
```java
public classs CustomAdaptFragment extends Fragment implements CancelAdapt{
}
- 在app初始化时开启对Fragment的支持
沉浸式适配
Blankj基于头条适配的最终优化方案
基于pt做的适配。即想要适配的那部分单位要改成pt
其源码、Demo 以及 API 如下所示:
AdaptScreen 相关 -> [AdaptScreenUtils.java][adaptScreen.java] -> [Demo][adaptScreen.demo]
1 | adaptWidth : 适配宽度 |
pt2Px 及 px2Pt 是提供给需要动态操作 View 的。
如上只需依赖 AndroidUtilCode 最新版本即可:
1 | implementation 'com.blankj:utilcode:1.23.2' |
启动页变形适配
启动页图片四周是纯色的
方案一:用点9图
方案二:用layer-list图层 来实现
drawable/startup.xml1
2
3
4
5
6
7
8
9
10
11
12
13
14
<layer-list xmlns:android="http://schemas.android.com/apk/res/android">
<item>
<shape>
<solid android:color="#CE171C"/>
</shape>
</item>
<item>
<bitmap
android:gravity="fill"
android:src="@drawable/qidongye"/>
</item>
</layer-list>res/styles.xml1
2
3
4
5
6
7
8<resources xmlns:tools="http://schemas.android.com/tools">
<style name="WithBgTheme" parent="Theme.MaterialComponents.Light.NoActionBar">
<item name="android:windowBackground">@drawable/qidongye</item><!--img_default_launch_page-->
<item name="android:windowTranslucentStatus" tools:targetApi="19">true</item>
<item name="android:windowContentOverlay">@null</item>
<item name="android:overScrollMode">never</item>
</style>
</resources>使用
AndroidManifest.xml1
2
3
4
5
6
7
8
9
10<activity
android:name=".launcher.activity.LauncherActivity"
android:configChanges="orientation|screenSize|keyboardHidden"
android:screenOrientation="portrait"
android:theme="@style/WithBgTheme">
<intent-filter>
<action android:name="android.intent.action.MAIN" />
<category android:name="android.intent.category.LAUNCHER" />
</intent-filter>
</activity>
bitmap:
启动页图片四周不是纯色的
刘海屏适配
- Android P 刘海屏适配方案
Android P 支持最新的全面屏以及为摄像头和扬声器预留空间的凹口屏幕。通过全新的 DisplayCutout 类,可以确定非功能区域的位置和形状,这些区域不应显示内容。要确定这些凹口屏幕区域是否存在及其位置,使用 getDisplayCutout() 函数。
| DisplayCutout 类方法 | 说明 |
|---|---|
getBoundingRects() |
返回Rects的列表,每个Rects都是显示屏上非功能区域的边界矩形 |
getSafeInsetLeft() |
返回安全区域距离屏幕左边的距离,单位是px |
getSafeInsetRight() |
返回安全区域距离屏幕右边的距离,单位是px |
getSafeInsetTop() |
返回安全区域距离屏幕顶部的距离,单位是px |
getSafeInsetBottom() |
返回安全区域距离屏幕底部的距离,单位是px |
Android P 中 WindowManager.LayoutParams 新增了一个布局参数属性 layoutInDisplayCutoutMode:
| 模式 | 模式说明 |
|---|---|
LAYOUT_IN_DISPLAY_CUTOUT_MODE_DEFAULT |
只有当DisplayCutout完全包含在系统栏中时,才允许窗口延伸到DisplayCutout区域。 否则,窗口布局不与DisplayCutout区域重叠。 |
LAYOUT_IN_DISPLAY_CUTOUT_MODE_NEVER |
该窗口决不允许与DisplayCutout区域重叠。 |
LAYOUT_IN_DISPLAY_CUTOUT_MODE_SHORT_EDGES |
该窗口始终允许延伸到屏幕短边上的DisplayCutout区域。 |
- Android P 之前的刘海屏适配
不同厂商的刘海屏适配方案不尽相同,需分别查阅各自的开发者文档。
刘海屏适配2
华为:
- 华为刘海屏手机安卓O版本适配指导:https://devcenter-test.huawei.com/consumer/cn/devservice/doc/50114
- 华为全面屏适配技术指导:https://devcenter-test.huawei.com/consumer/cn/devservice/doc/50111
全面屏、普通屏和凹凸屏:
- 普通屏:纵横比为16:9 比值为1.78
- 全面屏:纵横比为17:9 18:9… 屏幕比例超过1.86的屏幕
- 凹凸屏:屏幕有一块缺陷,俗称刘海屏。
华为的适配分两种:
- 华为O版本手机:华为O版本方案
- 华为P版本手机:华为O版本方案+谷歌P版本方案
所以这里只会有华为O版本方案的适配方案。
华为刘海屏手机安卓O版本适配方案
判断是否是刘海屏
1
2
3
4
5
6
7
8
9
10
11
12
13
14
15
16
17public static boolean hasNotchInScreen(Context context) {
boolean hasNotch = false;
try {
ClassLoader cl = context.getClassLoader();
Class HwNotchSizeUtil = cl.loadClass("com.huawei.android.util.HwNotchSizeUtil");
Method get = HwNotchSizeUtil.getMethod("hasNotchInScreen");
hasNotch = (boolean) get.invoke(HwNotchSizeUtil);
} catch (ClassNotFoundException e) {
Log.e("test", "hasNotchInScreen ClassNotFoundException");
} catch (NoSuchMethodException e) {
Log.e("test", "hasNotchInScreen NoSuchMethodException");
} catch (Exception e) {
Log.e("test", "hasNotchInScreen Exception");
} finally {
return hasNotch;
}
}获取刘海尺寸
1
2
3
4
5
6
7
8
9
10
11
12
13
14
15
16
17public static int[] getNotchSize(Context context) {
int[] mNotchSize = new int[]{0, 0};
try {
ClassLoader cl = context.getClassLoader();
Class HwNotchSizeUtil = cl.loadClass("com.huawei.android.util.HwNotchSizeUtil");
Method get = HwNotchSizeUtil.getMethod("getNotchSize");
mNotchSize = (int[]) get.invoke(HwNotchSizeUtil);
} catch (ClassNotFoundException e) {
Log.e("test", "getNotchSize ClassNotFoundException");
} catch (NoSuchMethodException e) {
Log.e("test", "getNotchSize NoSuchMethodException");
} catch (Exception e) {
Log.e("test", "getNotchSize Exception");
} finally {
return mNotchSize;
}
}页面使用刘海区显示
方案一:
使用新增的Meta-data属性android.notch_support,在应用的AndroidManifest.xml中增加meta-data属性,此属性不仅可以针对Application生效,也可以对Activity配置生效。
具体方式如下所示:
1
<meta-data android:name="android.notch_support" android:value="true"/>
对Application生效,意味着该应用的所有页面,系统都不会做竖屏场景的特殊下移或者是横屏场景的右移特殊处理
1
2
3
4
5
6
7
8
9
10
11
12
13
14
15
16
17
18
19<application
android:allowBackup="true"
android:icon="@mipmap/ic_launcher"
android:label="@string/app_name"
android:roundIcon="@mipmap/ic_launcher_round"
android:testOnly="false"
android:supportsRtl="true"
android:theme="@style/AppTheme">
<meta-data android:name="android.notch_support" android:value="true"/>
<activity android:name=".MainActivity">
<intent-filter>
<action android:name="android.intent.action.MAIN"/>
<category android:name="android.intent.category.LAUNCHER"/>
</intent-filter>
</activity>
</application>对Activity生效,意味着可以针对单个页面进行刘海屏适配,设置了该属性的Activity系统将不会做特殊处理:
1
2
3
4
5
6
7
8
9
10
11
12
13
14
15
16
17
18
19
20
21
22<application
android:allowBackup="true"
android:icon="@mipmap/ic_launcher"
android:label="@string/app_name"
android:roundIcon="@mipmap/ic_launcher_round"
android:testOnly="false"
android:supportsRtl="true"
android:theme="@style/AppTheme">
<activity android:name=".MainActivity">
<intent-filter>
<action android:name="android.intent.action.MAIN"/>
<category android:name="android.intent.category.LAUNCHER"/>
</intent-filter>
</activity>
<activity android:name=".LandscapeFullScreenActivity" android:screenOrientation="sensor">
</activity>
<activity android:name=".FullScreenActivity">
<meta-data android:name="android.notch_support" android:value="true"/>
</activity>
</application>
方案二:
使用给window添加新增的FLAG_NOTCH_SUPPORT (应用通过增加华为自定义的刘海屏flag,请求使用刘海区显示)
对Application生效,意味着该应用的所有页面,系统都不会做竖屏场景的特殊下移或者是横屏场景的右移特殊处理
1 | /*刘海屏全屏显示FLAG*/ |
注意:
华为手机个用户开发是否使用刘海屏,这就意味着,如果用户选择隐藏顶部区域,那么在华为手机上刘海屏和普通屏没有区别。
下面是判断用户是否隐藏显示区域
1 | public static final String DISPLAY_NOTCH_STATUS = "display_notch_status"; |
关于上面的方法只是介绍,具体的适配逻辑,文末再说。
oppo:
OPPO凹形屏适配说明:https://open.oppomobile.com/service/message/detail?id=61876
判断是否为凹型屏
1
2//回 true为凹形屏
context.getPackageManager().hasSystemFeature(“com.oppo.feature.screen.heteromorphism”)凹形屏坐标获取
1
2
3
4
5
6
7
8
9
10
11
12
13
14
15
16
17
18
19
20
21
22
23
24
25
26
27
28
29
30
31
32
33
34
35
36//方法引用
String mProperty = "";
mProperty = SystemProperties.get("ro.oppo.screen.heteromorphism");
//具体类实现
/**
* 具体返回格式是 [378,0:702,80] 什么意思???
* 凹型屏的刘海部分看作是一个矩形。[378,0:702,80] 就代表它的左上角和右下角的坐标。值得注意的是
* [378,0:702,80]对应的是[横坐标X,纵坐标Y:横坐标X1,纵坐标Y] ===> [X,Y:X1,Y]
*/
public static class SystemProperties {
public static String get(String key) {
String value = "";
Class<?> cls = null;
try {
cls = Class.forName("android.os.SystemProperties");
Method hideMethod = cls.getMethod("get", String.class);
Object object = cls.newInstance();
value = (String) hideMethod.invoke(object, key);
} catch (ClassNotFoundException e) {
Log.e("error", "get error() ", e);
} catch (NoSuchMethodException e) {
Log.e("error", "get error() ", e);
} catch (InstantiationException e) {
Log.e("error", "get error() ", e);
} catch (IllegalAccessException e) {
Log.e("error", "get error() ", e);
} catch (IllegalArgumentException e) {
Log.e("error", "get error() ", e);
} catch (InvocationTargetException e) {
Log.e("error", "get error() ", e);
}
return value;
}
}
vivo
https://dev.vivo.com.cn/documentCenter/doc/103
就提供一个类(android.util.FtFeature)一个方法(public static boolean isFeatureSupport(int mask)),而且必须要反射获取
1 | //是否是凹型屏 |
小米:
https://dev.mi.com/console/doc/detail?pId=1293
小米的适配分两种:
- 小米O版本手机:小米O版本方案
- 小米P版本手机:小米P版本方案(因为和google的方案有出入,所以无法做到和google发布的P版本方案兼容)
也就是说小米的适配方案都得是自家的
Android O
1、判断是否为凹型屏
原文是这样的:系统增加了 property ro.miui.notch,值为1时则是 Notch 屏手机。
1 | SystemProperties.getInt("ro.miui.notch", 0) == 1; |
???你还真以为我们应用层的App可以直接用SystemProperties???天真。
一下代码仅供参考:
1 | public static boolean hasNotchInScreen(Context context) { |
2、获取凹型屏的高度和宽度
1 | /** |
3、Application 级别的控制接口
1 | <meta-data |
其中value的值有一下意思:
- none: 横竖屏都不绘制耳朵区
- portrait: 竖屏绘制到耳朵区
- landscape: 横屏绘制到耳朵区
- portrait|landscape: 横竖屏都绘制到耳朵区
4、Window 级别的控制接口
Android P
魅族:目前没找到刘海屏
这是魅族状态栏适配的地址,免得以后找。
http://open-wiki.flyme.cn/doc-wiki/index#id?79
一加:有刘海屏,找不到适配方法
联想:有刘海屏,找不到适配方法
360手机:没有有刘海屏
google官方:
Android P 支持刘海屏
关键类:
DisplayCutout
google是这样说的:如果要渲染到剪切区域,可以使用 WindowInsets.getDisplayCutout()来检索包含每个剪切块的安全插入和边界框的 DisplayCutout对象。通过这些API,您可以检查内容是否与剪切区重叠,以便在需要时重新定位。
具体获取代码如下:
1 | //获取方法 |
三种模式:
LAYOUT_IN_DISPLAY_CUTOUT_MODE_DEFAULT:仅仅当系统提供的bar完全包含了刘海区时才允许window扩展到刘海区,否则window不会和刘海区重叠LAYOUT_IN_DISPLAY_CUTOUT_MODE_SHORT_EDGES:允许window扩展到刘海区(原文说的是短边的刘海区, 目前有刘海的手机都在短边,所以不用关心)LAYOUT_IN_DISPLAY_CUTOUT_MODE_NEVER:不允许window扩展到刘海区。
设置是否允许window扩展到刘海区的代码:
1 | WindowManager.LayoutParams lp =getWindow().getAttributes(); |
具体代码如下:
1 | DisplayCutout cutout = getDisplayCutout(); |
参看文章:
- https://blog.csdn.net/xiangzhihong8/article/details/80317682
- https://blog.csdn.net/u011810352/article/details/80587531
- Android各大手机品牌手机跳转到权限管理界面