Jetpack-ViewModel

ViewModel是View与Model之间的一个桥梁,项目中用在了网络请求数据之前,它会回调到View或者Presenter层

ViewModel

ViewModel介于View(视图)和Model(数据模型)之间的一个东西。它起到了桥梁的作用,使视图和数据能够分离开,也能够保持通信。

Activity:展示数据;处理用户交互

ViewModel:持有UI数据

viewmodel生命周期

jetpack-viewmodel生命周期.png

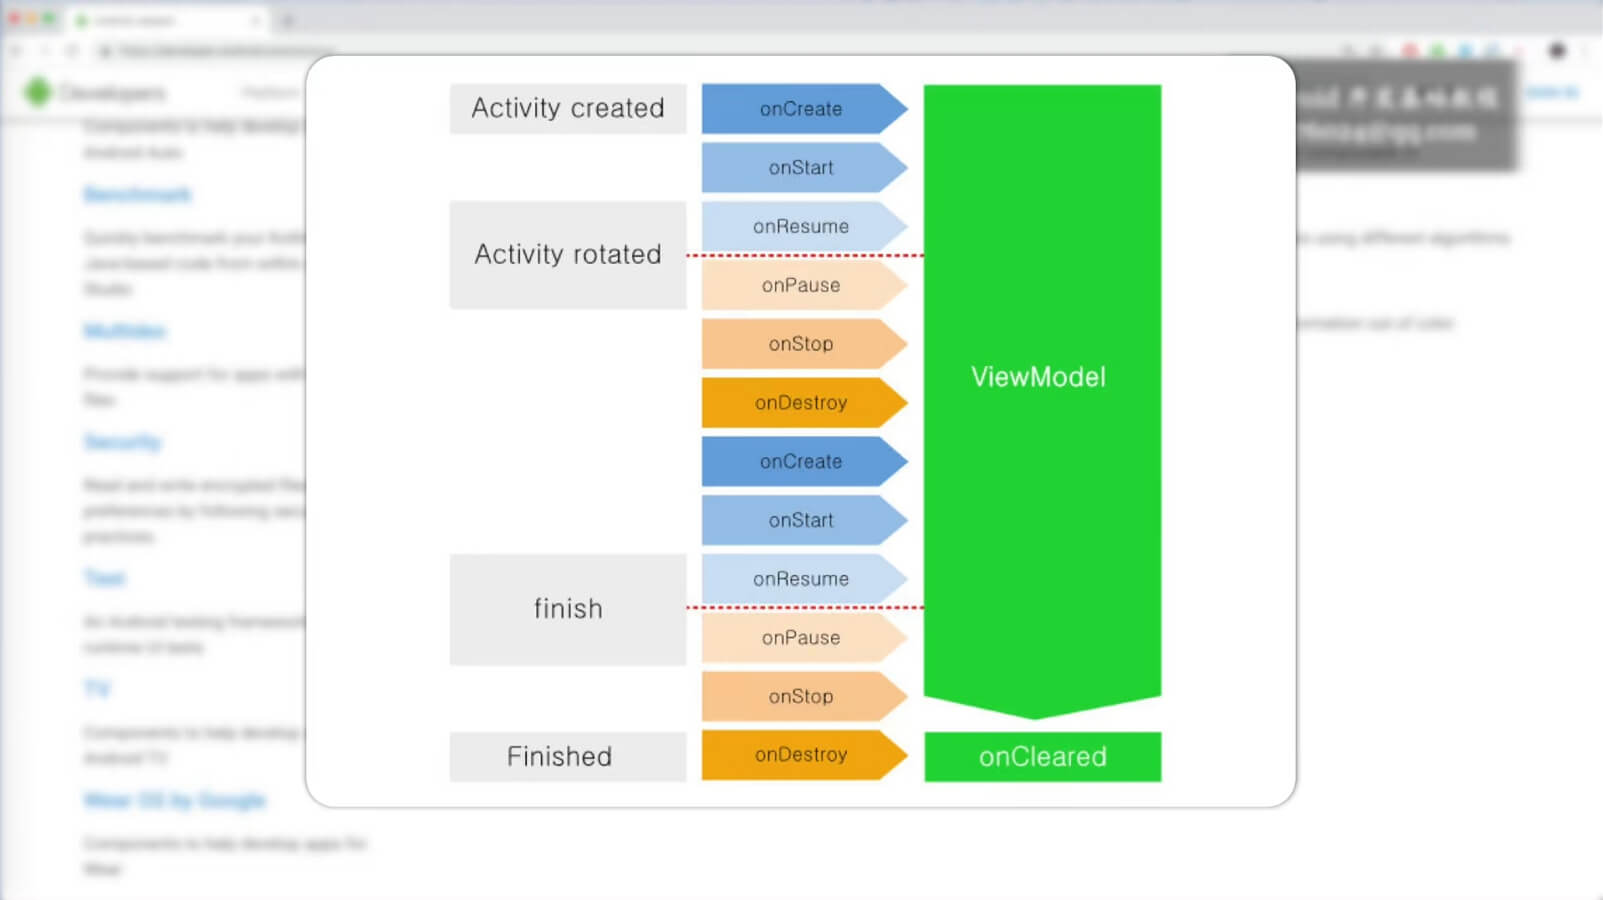
viewmodel的生命周期贯穿整个Activity的生命周期,当此Activity调用onDestroy时才销毁

ViewModel独立于配置变化。即屏幕旋转等所导致的Activity重建,不会影响ViewModel的生命周期,所以不用考虑数据的存储与恢复。
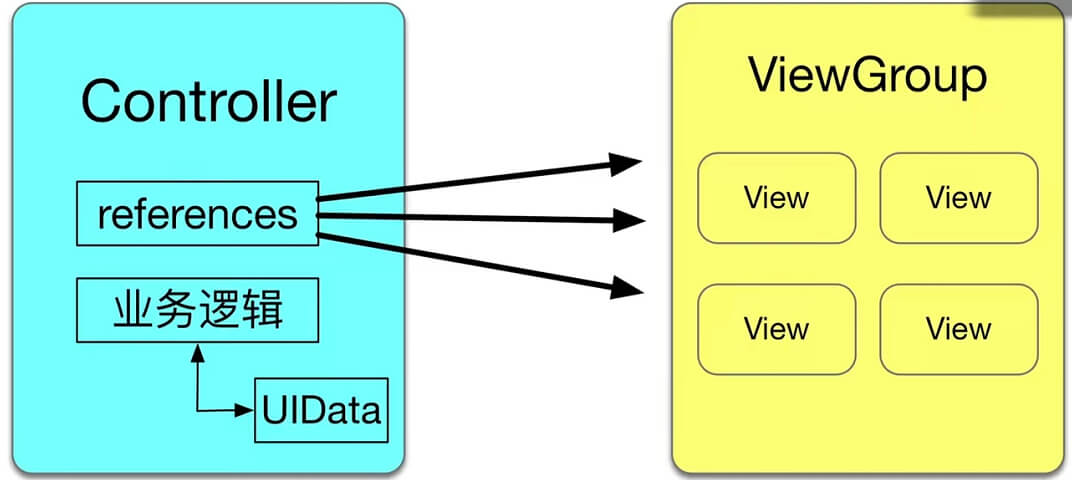
用ViewModel前后的架构图

未用jetpack前的mvc架构

jetpack-未用jetpack前的mvc架构.png

用viewmodel后的架构图

jetpack-用viewmodel后的架构图.png

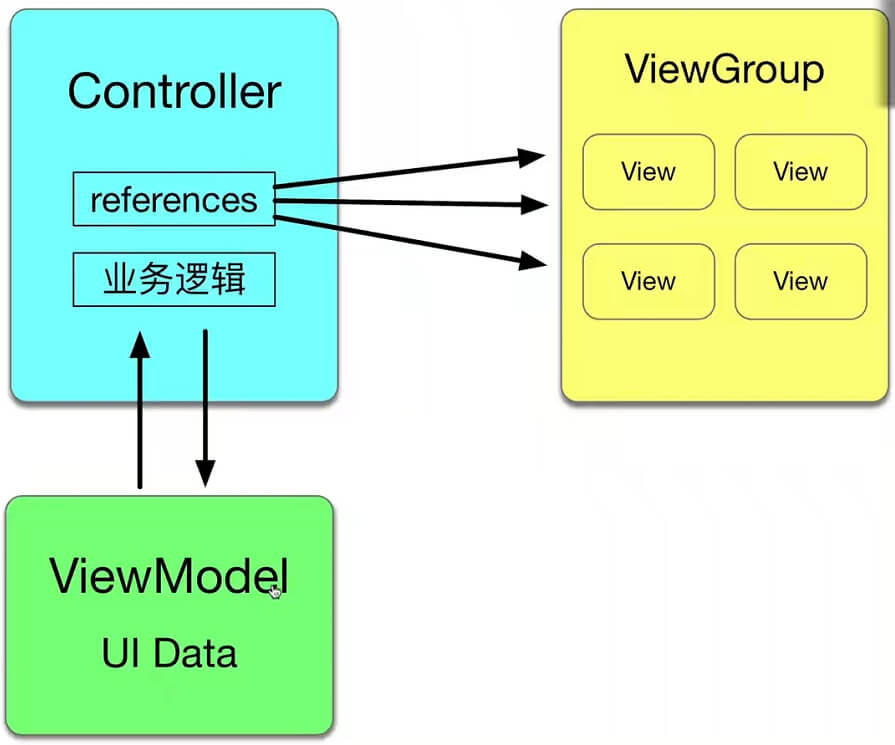
使用ViewModel后把页面数据统一到一个单独类里,不用在Activity中进行设置变量等来管理。

ViewModel的基本使用方法

  1. 在 app 的 build.gradle 中添加依赖
1
2
3
dependencies{
implementation "androidx.lifecycle:lifecycle-viewmodel:2.2.0"
}
  1. 实现个计时器功能
1
2
3
4
5
6
7
8
9
10
11
12
13
14
15
16
17
18
19
20
21
22
23
24
25
26
27
28
29
30
31
32
33
34
35
36
37
38
39
40
41
42
43
44
45
46
public class TimerViewModel extends ViewModel{
private Timer timer;
private int currentSecond;

/**
* 开始计时
*/
public void startTiming(){
if(timer == null){
currentSecond = 0;
timer = new Timer();
TimerTask timerTask = new TimerTask(){
@Override
public void run(){
currentSecond ++;
if(onTimeChangeListener != null){
onTimeChangeListener.onTimeChanged(currentSecond);
}
}
};
timer.schedule(timerTask, 1000, 1000);
}
}

/**
* 通过接口的方式,完成对调用者的通知
* 实际上这种方式不是很好,更好的方式是通过 LiveData 组件来实现
*/
public interface OnTimeChangeListener{
void onTimeChanged(int second);
}

private OnTimeChangeListener onTimeChangeListener;
public void setOnTimeChangeListener(OnTimeChangeListener onTimeChangeListener){
this.onTimeChangeListener = onTimeChangeListener;
}

/**
* 清理资源
*/
@Override
public void onCleared(){
super.onCleared();
timer.cancel();
}
}
1
2
3
4
5
6
7
8
9
10
11
12
13
14
15
16
17
18
19
20
21
22
23
24
25
26
27
28
//使用这个 TimeViewModel
public class TimerActivity extends AppCompatActivity{
@Override
protected void onCreate(Bundle savedInstanceState){
super.onCreate(savedInstanceState);
setContentView(R.layout.activity_timer);
initComponent();
}

private void initComponent(){
final TextView tvTime = findViewById(R.id.tvTime);
//ViewModelProvider接收一个ViewModelStoreOwner对象作为参数。此处this指当前Activity
TimerViewModel timerViewModel = new ViewModelProvider(this).get(TimerViewModel.class);
timerViewModel.setOnTimeChangeListener(new TimerViewModel.OnTimeChangeListener(){
@Override
public void onTimeChanged(final int second){
//更新 UI 界面
runOnUiThread(new Runnable(){
@Override
public void run(){
tvTime.setText("TIME:" + second);
}
});
}
});
timerViewModel.startTiming();
}
}

AppCompatActivity的父类FragmentActivity有实现了ViewModelStoreOwnerViewModelStoreOwner里是用HashMap<String, ViewModel>来存储 ViewModel 的,即 ViewModel 与页面之间没有直接的关联,它们通过 ViewModelProvider 进行关联。所以要注意:不要向 ViewModel 传入任何类型的 Context 或带有 Context 引用的对象,因为可能会导致内存泄露

当希望在 ViewModel 中使用 Context ,那么可以使用 AndroidViewModel 类,并传入 Application 作为 Context

ViewModel 与 onSaveInstanceState() 方法

onSaveInstanceState() 只能保持少量的、能支持序列化的数据;ViewModel支持页面中所有的数据。

onSaveInstanceState() 可以持久化页面数据;ViewMode 不支持数据的持久化,当界面被彻底销毁时,ViewModel及其持有的数据就不存在了。

ViewModelSavedState

ViewModel+LiveData+DataBinding+ViewModelSavedState 架构

build.gradle

1
2
3
4
5
6
7
8
9
10
11
12
13
14
15
16
17
18
19
20
21
22
23
24
25
buildscript {
ext.kotlin_version = "1.4.10"
repositories {
google()
jcenter()
}
dependencies {
classpath "com.android.tools.build:gradle:4.0.1"
classpath "org.jetbrains.kotlin:kotlin-gradle-plugin:$kotlin_version"

// NOTE: Do not place your application dependencies here; they belong
// in the individual module build.gradle files
}
}

allprojects {
repositories {
google()
jcenter()
}
}

task clean(type: Delete) {
delete rootProject.buildDir
}

app/build.gradle

  1. 打开databinding开关
  2. 加入androidx.lifecycle:lifecycle-viewmodel-savedstate依赖库
1
2
3
4
5
6
7
8
9
10
11
12
13
14
15
16
17
18
19
20
21
22
23
24
25
26
27
28
29
30
31
32
33
34
35
36
37
38
39
40
41
42
43
apply plugin: 'com.android.application'
apply plugin: 'kotlin-android'
apply plugin: 'kotlin-android-extensions'

android {
compileSdkVersion 29
buildToolsVersion "30.0.2"

defaultConfig {
applicationId "com.ab.viewmodelsavedstate"
minSdkVersion 16
targetSdkVersion 29
versionCode 1
versionName "1.0"

testInstrumentationRunner "androidx.test.runner.AndroidJUnitRunner"
//打开databinding的开关
dataBinding {
enabled true
}
}

buildTypes {
release {
minifyEnabled false
proguardFiles getDefaultProguardFile('proguard-android-optimize.txt'), 'proguard-rules.pro'
}
}
}

dependencies {
implementation fileTree(dir: "libs", include: ["*.jar"])
implementation "org.jetbrains.kotlin:kotlin-stdlib:$kotlin_version"
implementation 'androidx.core:core-ktx:1.3.1'
implementation 'androidx.appcompat:appcompat:1.2.0'
implementation 'androidx.constraintlayout:constraintlayout:2.0.1'
implementation 'androidx.lifecycle:lifecycle-extensions:2.2.0'
//接入viewmodel的savestate库
implementation 'androidx.lifecycle:lifecycle-viewmodel-savedstate:2.3.0-alpha07'
testImplementation 'junit:junit:4.12'
androidTestImplementation 'androidx.test.ext:junit:1.1.2'
androidTestImplementation 'androidx.test.espresso:espresso-core:3.3.0'
}

activity_main.xml

  1. 布局文件转为databinding格式的;同时调用viewModel中的属性和方法
1
2
3
4
5
6
7
8
9
10
11
12
13
14
15
16
17
18
19
20
21
22
23
24
25
26
27
28
29
30
31
32
33
34
35
36
37
38
39
<?xml version="1.0" encoding="utf-8"?>
<layout xmlns:android="http://schemas.android.com/apk/res/android"
xmlns:app="http://schemas.android.com/apk/res-auto"
xmlns:tools="http://schemas.android.com/tools">

<data>
<variable
name="data"
type="com.ab.viewmodelsavedstate.MyViewModel" />
</data>

<androidx.constraintlayout.widget.ConstraintLayout
android:layout_width="match_parent"
android:layout_height="match_parent"
tools:context=".MainActivity">

<TextView
android:id="@+id/textView5"
android:layout_width="wrap_content"
android:layout_height="wrap_content"
android:text="@{String.valueOf(data.getLiveData())}"
app:layout_constraintBottom_toBottomOf="parent"
app:layout_constraintEnd_toEndOf="parent"
app:layout_constraintStart_toStartOf="parent"
app:layout_constraintTop_toTopOf="parent"
app:layout_constraintVertical_bias="0.358" />

<Button
android:id="@+id/button7"
android:layout_width="wrap_content"
android:layout_height="wrap_content"
android:text="@string/plus1"
android:onClick="@{() -> data.add(1)}"
app:layout_constraintBottom_toBottomOf="parent"
app:layout_constraintEnd_toEndOf="parent"
app:layout_constraintStart_toStartOf="parent"
app:layout_constraintTop_toTopOf="parent" />
</androidx.constraintlayout.widget.ConstraintLayout>
</layout>

MyViewModel.kt

  1. viewmodel中加上SavedStateHandle来保存数据
1
2
3
4
5
6
7
8
9
10
11
12
13
14
15
16
17
18
//构造方法传参
class MyViewModel(private val handle: SavedStateHandle) : ViewModel() {
companion object{
//常量
const val KEY_NUMBER = "KEY_NUMBER"
}

fun getLiveData(): MutableLiveData<Int> {
if (!handle!!.contains(KEY_NUMBER)){
handle!!.set(KEY_NUMBER, 0)
}
return handle!!.getLiveData(KEY_NUMBER)
}

fun add(n: Int) {
getLiveData().value = getLiveData().value!! + n
}
}

activity中使用MainActivity.kt

  1. Activity中实例化DataBinding
  2. 实例化viewModel
  3. databinding赋值,指定lifecycleOwner对象
1
2
3
4
5
6
7
8
9
10
11
12
13
class MainActivity : AppCompatActivity() {
private lateinit var myViewModel: MyViewModel
private lateinit var binding: ActivityMainBinding
override fun onCreate(savedInstanceState: Bundle?) {
super.onCreate(savedInstanceState)
//databinding实例化,同时设置layout布局
binding = DataBindingUtil.setContentView(this, R.layout.activity_main)
//通过ViewModelProviders进行viewModel实例化
myViewModel = ViewModelProviders.of(this, SavedStateViewModelFactory(application, this)).get(MyViewModel::class.java)
binding.data = myViewModel
binding.lifecycleOwner = this
}
}