Gradle下载后的本地路径:打开AS,打开项目,更改为Project模式,找到External Libraries找某一个第三方库,然后点开,找个具体文件(比如AndroidManifest.xml)右键它选择Open In Explorer。
比如我现在的路径是:D:\dev\.gradle\caches\transforms-2\files-2.1\
依赖相关
查看项目依赖
Terminal中输入:
1 | gradlew :app:dependencies |
依赖多次(如果是同一个版本)没有问题
场景:moduleA依赖moduleB(B的libs中有个B.jar),moduleC依赖moduleA也依赖moduleB。moduleC调用这个B.jar,没有版本冲突等问题(因为是同一个版本的jar)
exclude排除依赖中的某个group
1 | // 单独排除某个模块中的依赖 |
用法:exclude group:’ ‘, module: ‘ ‘ 【group和module两个参数可分别单独使用】
说明:排除某个依赖,可解决部分传递依赖。
使用场景:
- 解决依赖冲突。若两个模块使用相同jar包的不同版本,gradle默认会使用最新版本的jar包,此时可通过exclude排除冲突。(版本冲突带来的问题最主要是API类或方法移除)
- 运行期无需此模块。
- 依赖传递无法找到时,可通过exclude排除。
- 版权原因需排除。
transitive是否传递本身的依赖给宿主程序
用法:transitive = true | false
说明:是否传递本身的依赖给宿主程序(使用传递依赖时,Gradle会将传递依赖一起下载下来。compile默认时开启传递依赖)
1 | compile('com.alibaba.android:ultraviewpager:1.0.4@aar') { |
@aar表示只下载该aar包,而不下该aar包所依赖的其他库。如果还不想使用@aar前提下的其依赖库,需要加transitive=false(默认是true开启传递依赖)。其中transitive表示传递依赖(间接依赖)。
transitive=true,等同于没有使用exclude排除依赖,每个包的依赖项都会被递归分析并添加进来。
transitive=false,等同于用exclude排除依赖。
force强制使用某版本
用法:force = true
作用:强制使用某个版本。出现冲突时,优先使用该版本解决。
1 | // 强制使用 support-v4 26.1.0版本 |
综合例子
1 | compile('org.hibernate:hibernate:3.1') { |
api、implementation、compile、compileOnly、provided
- implementation所依赖的库不会传递,只会在当前module中生效
比如:moduleA 用implementation依赖了 base库,moduleB依赖moduleA后想调用base库内方法是不行的。
- api跟2.x版本的compile一样,具有“穿透性”,对其他module是可见的
- compileOnly跟2.x版本的provided一样。只在编译时有效,不会参与打包
如果是自己创建的library给别人使用时,需要依赖 com.android.support的话,建议使用compileOnly,避免给使用者带来不便。
| 2.x的gradle | 说明 | |
|---|---|---|
| compile | api | 传递。对其他module可见 |
| porovided | compileOnly | 不传递。不参与打包,只在编译时有效 |
| implementation | 不传递。在当前module中生效 | |
| runtimeOnly | 会打到包中,运行时才有效。 | |
| testImplementation | ||
| androidTestImplementation | ||
| apt(在gradle2.2已过时) | annotationProcessor | 自动化构建 |
依赖配置
在 Android Gradle Plugin 3.0 时代,Google 使用 implementation 和 api 取代过去的 compile。其他配置项也进行了改名,方便大家理解其配置的含义。(老版本的接口没有被立刻删除但会在下一个主要版本中进行删除)
| 新配置 | 已启用配置 | 行为 |
|---|---|---|
| implementation | compile | 依赖项在编译时对模块可用,并且仅在运行时对模块的消费者可用。对于大型多项目构建,使用 implementation 而不是 api/compile 可以显著缩短构建时间,因为它可以减少构建系统需要重新编译的项目量。大多数应用和测试模块都应使用此配置。 |
| api | compile | 依赖项在编译时对模块可用,并且在编译时和运行时还对模块的消费者可用。此配置的行为类似于 compile(现已弃用),一般情况下,您应当仅在库模块中使用它。应用模块应使用 implementation,除非您想要将其 API 公开给单独的测试模块。 |
| compileOnly | provided | 依赖项仅在编译时对模块可用,并且在编译或运行时对其消费者不可用。此配置的行为类似于 provided(现已弃用)。 |
| runtimeOnly | apk | 依赖项仅在运行时对模块及其消费者可用。此配置的行为类似于 apk(现已弃用)。 |
举个例子:
假设 A 依赖 B,B 依赖 C。
如果 B 对 C 使用 implementation 依赖,则 A 无法调用 C 的代码
如果 B 对 C 使用 api 依赖,则 A 可以调用 C 的代码
如果 B 对 C 使用 compileOnly 依赖,则 A 无法调用 C 的代码,且 C 的代码不会被打包到 APK 中
如果 B 对 C 使用 runtimeOnly 依赖,则 A、B 无法调用 C 的代码,但 C 的代码会被打包到 APK 中
实际上每一个组件都有自己的 compileClasspath 和 runtimeClasspath
当一个组件参与编译时,Gradle 就会将其放在 compileClasspath 中
当一个组件参与打包时,Gradle 就会将其放在 runtimeClasspath 中
不同的依赖配置项,其实就是将声明的依赖放入不同组件的不同的 classpath 中,回到上面的例子
对于 implementation ,其实就是将 C 放入 B 的 compileClasspath 和 runtimeClasspath,放入 A 的 runtimeClasspath 中,从而实现 A 如果调用 C 的代码,在 A 的编译阶段 javac 报错,但最终 C 会被打包到 APK 包中
对于 api、compileOnly、runtimeOnly 原理相同
源码与二进制
当想要依赖一个源码工程时只需要这样写
1 | implementation project(':demo:mylibrary') |
而且我们可以明确知道 mylibrary 中的依赖都会被正确打包到 APK 中
当我们依赖二进制需要这样写
1 | implementation 'androidx.appcompat:appcompat:1.0.2' |
当执行依赖命令(只输出 release 包的 runtimeClasspath)
1 | ./gradlew :app:dependencies --configuration releaseRuntimeClasspath > dependencies.txt |
输出依赖关系图时会看到并不是仅仅依赖一个 appcompat 组件(只显示部分依赖),还包含该组件自己的依赖,以及依赖的依赖,直到组件自身没有依赖,这样的特性叫做依赖传递
1 | releaseRuntimeClasspath - Resolved configuration for runtime for variant: release |
那么Gradle是怎么确定这些依赖呢?当使用Maven规范上传组件时,不单单会上传组件的二进制,还会上传一个pom.xml文件,依赖信息就在这个文件当中。
看看二进制被上传后在服务器是以怎样的结构存放的:
点击一项查看:
有上传的二进制 aar,也有 pom 文件,还有我们在上传时自定义的文件 readme
再看看当二进制被下载后在本地是如何存放的:
下面是个简单的POM文件
可用看到有两个 dependency,需要注意的是 scope,也会分为 runtime 和 compile,runtime 不会参与编译,但会参与打包,compile 会参与编译和打包
两个实际例子:
一:假设 A 依赖 B,B 依赖 C
B 对 C 使用 implementation 依赖
B 中有类 Foo 继承于 C中的 Bar
在 A 中使用类 Foo 时会报错找不到类 Bar,解决办法只能让 A 再依赖 C,所以应该尽量避免使用继承
二:假设 A 依赖 B,B 依赖 C
BC 是二进制, B 的 POM 中对 C 的依赖是 runtime
在 Gradle 4.4 中,A 依然可以调用 C 的代码,这个问题在 Gradle 5.0 后被修复
依赖冲突
什么是依赖冲突:
假设 ABC 是源码,D 是二进制,A 声明依赖 B,A 声明依赖 C,B 声明依赖 D 1.0 版本,C 声明依赖 D 1.1版本,这时,D 有依赖冲突,需要确定是使用 1.0 还是 1.1 版本
如何解决依赖冲突:
- 进行编译时,B 编译时依赖 D 的1.0版本,C 编译时依赖 D 的1.1版本,但最终打包到 apk 中 D 的版本是 1.1,因为
版本号冲突默认选择最高版本 - Gradle 为我们提供了一系列解决依赖冲突的规则如:不允许依赖传递,exclude 移除一个依赖,替换一个组件为另一个组件,这些方法就不一一介绍了,按需百度即可
- 百度app在此基础上增加规则:如果最终应用的版本号高于在 version.properties 定义的版本号则报错
注意:
- 假设 D 发布 1.2 版本,但 B、C 都没有基于 D 1.2 版本发布新版本,则最终打包还是 D 的 1.1 版本,所以所有组件最终被打包到 APK 包中的版本都为 version.properties 中定义的版本
- 假设 D 的 MavenId 由 D 改成了 E,C 基于 E 发布二进制,B 还是老样子,在实际打包中会报类重复的错误,原因就是 B 的 POM 文件中依赖的还是 D,所以需要让 B 基于 D 改名后的 E重新发一个二进制
APK
只会打包到apk文件中,而不参与编译,所以不能在代码中直接调用jar中的类或方法,否则在编译时会报错
Test compile
Test compile 仅仅是针对单元测试代码的编译编译以及最终打包测试apk时有效,而对正常的debug或者release apk包不起作用。
Debug compile
Debug compile 仅仅针对debug模式的编译和最终的debug apk打包。
Release compile
Release compile 仅仅针对Release 模式的编译和最终的Release apk打包。
AS library生成jar包和aar的方法总结
生成jar包(针对的是类库library)
- 在
library/build.gradle中的最后添加
1 | //task to delete the old jar |
其中AndroidPlugin.jar就是生成的jar包名
- 实现上面操作之后 点击右边的Gradle侧边栏,选择library目录下
Tasks->other->exportJar方法
运行完毕后 你就可以在library项目文件下面的release文件夹里面找到生成的jar
jar包的使用
在app/build.gradle中dependencies中添加
1 | dependencies{ |
生成aar包
- 选择
library目录下的Tasks->build->assembleRelease方法 - 等待运行完毕后去
buile->outputs->aar的文件夹下拷贝出来即可
aar包使用
app/build.gradle中,添加
1 | repositories { |
1 | dependencies{ |
指定ModuleB的aar、jar也在当前library中一起打包到aar中
在library的build.gradle中,最底部添加(dependencies外),然后执行 gradlew genAar任务
1 | //把所有依赖的 jar 包拷贝至 build/outputs/aar/libs |
AS 生成assert文件
右键项目的某个module,选择Folder->Assets Folder即可
引用assert文件
1 | mWebView.loadUrl("file:///android_asset/test.html"); |
aar包设置成本地
拿oaid的aar包举例:
项目根目录下创建文件夹localRepo;
在localRepo下创建文件夹oaid_sdk
localRepo/oaid_sdk下
新建
.gitignore1
/build
新建
build.gradle1
2configurations.maybeCreate("default")
artifacts.add("default", file('oaid_sdk_1.0.25.aar'))黏贴
oaid_sdk_1.0.25.aar
在
settings.gradle中添加1
include ':localRepo:oaid_sdk'
使用:
app/build.gradle中添加1
2
3
4dependencies {
//移动安全联盟OAID
api project(path: ':localRepo:oaid_sdk')
}
依赖的优雅写法
使用buildSrc
缺点:无法使用AGP
根目录下新建buildSrc
\buildSrc\src\main\groovy\Config.groovy1
2
3
4
5
6
7
8
9
10
11
12
13
14
15
16
17
18
19
20
21
22
23
24
25
26
27
28
29
30
31
32
33
34
35
36class Config {
static applicationId = "com.teach.aixuepinyin"
static appName = 'AucFrame'
static compileSdkVersion = 28
static minSdkVersion = 19
static targetSdkVersion = 27
static versionCode = 202006//100100 改打包版本改这个
static versionName = '2.2.6'// E.g. 1.9.72 => 1,009,072 改打包版本改这个
static buildToolsVersion = "28.0.2"
static support_version = "27.1.1"
static retrofit2 = "2.3.0"
static depConfig = [
support : [
appcompat_v7: "com.android.support:appcompat-v7:$support_version",
design : "com.android.support:design:$support_version",
multidex : "com.android.support:multidex:1.0.3",
constraint : "com.android.support.constraint:constraint-layout:1.1.3",
],
bugly : 'com.tencent.bugly:crashreport:3.3.3',
gsyvideoplayer: 'com.shuyu:GSYVideoPlayer:8.1.2',
eventbus: 'org.greenrobot:eventbus:3.0.0',
gson: 'com.google.code.gson:gson:2.8.5',
wechatsdk: 'com.tencent.mm.opensdk:wechat-sdk-android-without-mta:5.1.4',
immersionbar: 'com.gyf.immersionbar:immersionbar:3.0.0',
junit: 'junit:junit:4.12',
okhttp3: 'com.squareup.okhttp3:okhttp:3.11.0',
fastjson: 'com.alibaba:fastjson:1.2.54',
glide: 'com.github.bumptech.glide:glide:4.8.0',
smartRefreshLayout: 'com.scwang.smartrefresh:SmartRefreshLayout:1.0.4-4', //版本随意(非必须,引用可以解决无法预览问题)
immersionbar: 'com.gyf.immersionbar:immersionbar:3.0.0',
utilcode: 'com.blankj:utilcode:1.30.5',
BaseRecyclerViewAdapterHelper: 'com.github.CymChad:BaseRecyclerViewAdapterHelper:2.9.40'
]
}\buildSrc\.gitignore1
/build
\buildSrc\build.gradle1
2
3
4
5
6
7
8
9
10
11
12
13repositories {
google()
jcenter()
}
apply {
plugin 'groovy'
plugin 'java-gradle-plugin'
}
dependencies {
implementation gradleApi()
implementation localGroovy()
implementation "commons-io:commons-io:2.6"
}
使用
如
app\build.gradle1
2
3
4
5
6
7
8
9
10
11
12
13
14
15
16
17
18
19
20
21
22
23
24
android {
    compileSdkVersion Config.compileSdkVersion
    buildToolsVersion Config.buildToolsVersion
    defaultConfig {
        applicationId Config.applicationId
        minSdkVersion Config.minSdkVersion
        targetSdkVersion Config.targetSdkVersion
        versionCode Config.versionCode
        versionName Config.versionName
        //...
    }
    //...
}

dependencies {
    api fileTree(include: ['*.jar'], dir: 'libs')
    testImplementation Config.depConfig.junit
    implementation Config.depConfig.support.appcompat_v7
    implementation Config.depConfig.support.design
    implementation Config.depConfig.support.multidex
    implementation Config.depConfig.support.constraint
    //...
}
抽取到congifg.gradle
根目录新建
config.gradle1
2
3
4
5
6
7
8
9
10
11
12
13
14
15
16
17
18
19
20
21
22
23
24
25
26
27
28
29
30ext {
android = [
geren_applicationId : "com.xm597.app",
qiye_applicationId : "com.rcw597.app",
compileSdkVersion : 29,
buildToolsVersion : "30.0.2",
minSdkVersion : 21,
targetSdkVersion : 29,
versionCode : 94,
versionName : "5.0.7",
appSourceCompatibility : JavaVersion.VERSION_1_8,
appTargetCompatibility : JavaVersion.VERSION_1_8,
]
version = [
androidSupportSdkVersion : "28.0.0",
androidXSdkVersion : "1.1.0",
]
dependencies = [
//support
"support-annotations" : "com.android.support:support-annotations:${version["androidSupportSdkVersion"]}",
//androidx
"appcompat" : "androidx.appcompat:appcompat:${version["androidXSdkVersion"]}",
"legacy-support-v4" : "androidx.legacy:legacy-support-v4:1.0.0",
]
}在根目录的
build.gradle中引入config.gradle1
2
3
4import java.text.SimpleDateFormat
//位置在首行
apply from: "config.gradle"
//...使用:如
app\build.gradle1
2
3
4
5
6
7
8
9
10
11
12
13
14
15
16
17
18
19
20
21
22
23
24
25
26
27
28
29
30
31
32
33
34
35android {
compileSdkVersion rootProject.ext.android["compileSdkVersion"]
defaultConfig {
if (!isSingleModule.toBoolean()) {
applicationId rootProject.ext.android["geren_applicationId"]
}
minSdkVersion rootProject.ext.android["minSdkVersion"]
targetSdkVersion rootProject.ext.android["targetSdkVersion"]
versionCode rootProject.ext.android["versionCode"]
versionName rootProject.ext.android["versionName"]
//...
}
//...
}
dependencies {
implementation fileTree(dir: 'libs', include: ['*.jar'])
//ARouter
// 要与compiler匹配使用,均使用最新版可以保证兼容
implementation(rootProject.ext.dependencies["arouter"]) {
exclude module: 'support-v4'
exclude module: 'support-annotations'
}
annotationProcessor rootProject.ext.dependencies["arouter-compiler"]
implementation rootProject.ext.dependencies["multidex"]
testImplementation rootProject.ext.dependencies["junit"]
androidTestImplementation rootProject.ext.dependencies["espresso-core"]
//...
//另外,还有种引用整个集合的方法,比如
//if(!rootProject.ext.dependencies.isEmpty()){
// implementation rootProject.ext.dependencies.values()
/}
}
依赖相关问题
Direct local .aar file dependencies are not supported

法一:把aar放到单独的模块中,再去关联它
I recently encountered the same issue, the fix was to remove the library from
libs/and import it usingFile -> New -> New Module -> Import .JAR/.AAR Package, then referencing it in the library modulebuild.gradlefile:1
2
3dependencies {
implementation project(":imported_aar_module")
}上述的操作在AS4.2上界面变了,那么直接手动创建这些文件
在项目根目录下手动创建个文件夹
localRepo;在
localRepo文件夹下新建文件夹com_heytap_msp-push;在
com_heytap_msp-push文件夹下放入com.heytap.msp-push-2.1.0.aar,新建build.gradle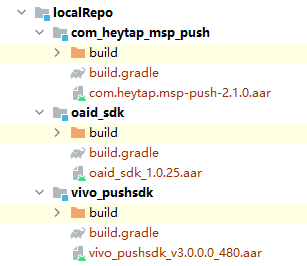
build.gradle内容:1
2configurations.maybeCreate("default")
artifacts.add("default", file('com.heytap.msp-push-2.1.0.aar'))在
settings.gradle中添加1
2
3include ':localRepo:com_heytap_msp_push'
include ':localRepo:oaid_sdk'
include ':localRepo:vivo_pushsdk'在调用的
module的build.gradle中添加1
2
3
4
5
6dependencies{
//...
implementation project(path: ':localRepo:com_heytap_msp_push')
implementation project(path: ':localRepo:vivo_pushsdk')
implementation project(path: ':localRepo:oaid_sdk')
}
(我没有按上述的解决,重新整理AndroidManifest文件,一些*provider、*receiver的要加 android:exported="false"解决了上述的问题)
法二 :用插件导出远程依赖库
因项目需要,打包aar包含第三方aar,如果直接对module进行打包会产生一些问题。
1 | What went wrong: |
错误信息说的很清楚构建aar不支持本地aar文件依赖
解决方案:fat-aar 能将依赖项合并并嵌入到生成的aar文件中。fat-aar项目地址:https://github.com/adwiv/android-fat-aar
由于fat-aar不再维护,使用起来有诸多需要修改的地方,而不支持高版本的gradle,极其坑爹,踩坑后找到替代方案,支持高版本的gradle无需修改脚本文件fat-aar-android:https://github.com/kezong/fat-aar-android
在需要打包成
aar的module的build.gradle中加入如下代码1
2apply plugin: 'com.android.library'
apply plugin: 'com.kezong.fat-aar'在
dependencies中以如下方式依赖第三方aar1
2
3
4dependencies{
//...
embed(name:'xxxxxrelease', ext:'aar')
}在项目根目录的
build.gradle中添加如下代码1
2
3
4
5
6
7
8
9
10
11
12
13
14
15
16
17
18
19
20buildscript{
repositories{
google()
jcenter()
maven{url 'https://plugins.gradle.org/m2/'}
}
dependencies{
classpath "com.android.tools.build:gradle:4.0.1"
classpath 'com.kezong:fat-aar:1.3.1'
}
}
allprojects{
repositories{
fatDir{
dirs 'libs'
}
google()
jcenter()
}
}运行
module下taskassembleRelease打包
在 AS 右侧的module下找到assembleRelease(在对应类包httpLibrary》Tasks》other》assembleRelease最终生成的
aar在module下的build中
在httpLibrary/build/outputs/aar下会有个httpLibrary-release.aar
关于如果A是B的依赖,B是C的依赖,C中引用A中的类时候的问题
【依赖传递问题】
- 其实是由于
compile以及implementation这个问题引起的implementation引入的包只给当前项目用
而compile引入的包不止给当前项目用 - 在Google IO 相关话题的中提到了一个建议,
就是依赖首先应该设置为implement的,如果没有错,那就用implement,
如果有错,那么使用api指令,这样会使编译速度有所增快。
在主工程依赖 shop 模块的远程依赖时,无法找到依赖的本地 aar 相关
场景:主工程app -> shop模块 -> 依赖本地aar
解决:将 本地 aar 放到远端,也是用远程依赖。
原因:主要在于Android 3.0 后本地 aar 依赖无法越级传递依赖。可以看远端 shop模块 maven打包时生成的 .pom 文件,查看具体依赖,发现gradle 会把本地 aar 依赖也当做一份远端依赖进行配置,但是没有group等信息,如此在主工程中依赖 shop 模块是,直接编译不通过,因为会视为远端仓库的依赖,但实际并不存在。(根本原因未知)
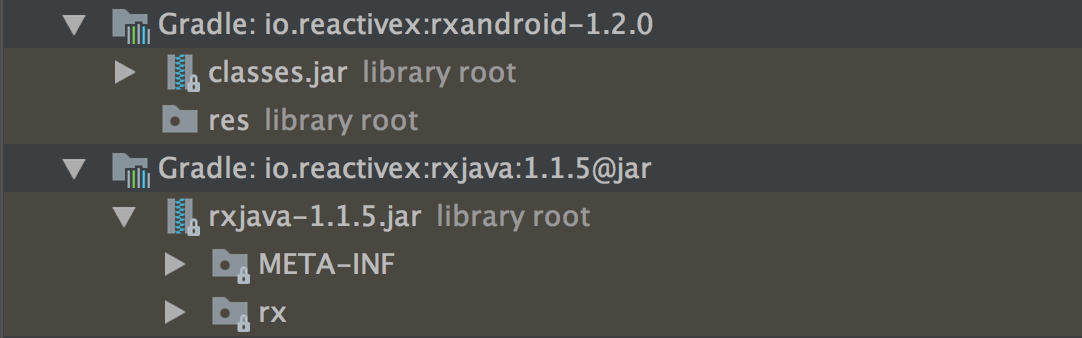
本地 jar 依赖和本地 aar 依赖的区别
- jar 文件只包含编译好的
.class文件和清单文件,不包含资源文件。所以如果没有res资源文件,可以在打包时,将packaging配置为jar格式; - aar 文件包含
class以及/res目录下的所有资源文件。
查看gradle下载的远程依赖区别就很明显:
zxing依赖冲突
可以看工程的External Libraries(或者运行的时候AS的报错信息)(用来确认名称),知道某个
Duplicate class ...是在哪个库底下
1 | debugImplementation(Config.depConfig.doraemonKit.debug){ |
Could not determine the dependencies of task ‘:app:mergeReleaseAssets’
Required by: project :app > id.zelory:compressor:2.1.0
问题:在AS的Terminal中输入gradlew assembleRelease会报Required by: project :app > id.zelory:compressor:2.1.0错误(而在AS右侧,使用点击assembleRelease不会报错)
解决:
so库相关
关于so库无法加载的问题
1、关于so库无法加载的问题,出现这样的报错:java.lang.UnsatisfiedLinkError: dalvik.system.PathClassLoader[DexPathList[...
需要在module中的build.gradle 中的 android{}标签内填这些
1 | ndk { |
1 | sourceSets.main { |
so库重复问题
现象:报More than one file was found with OS independent path 'lib/arm64-v8a/libpl_droidsonroids_gif.so'
原因:so库重复了
解决:
方法一:在app的build.gradle中加入
1 | android { |
方法二:如果方法一不起效,查看build.gradle中添加的依赖库和libs中的库是否重复了,如果重复了那么把libs中的库删除即可。
So文件加固检测安全问题
So文件为APK中包含的动态链接库文件,Android利用NDK技术将C/C++语言实现的核心代码编译为So库文件供Java层调用。So文件被破解可能导致应用的核心功能代码和算法泄露。攻击者利用核心功能与算法可轻易抓取到客户端的敏感数据,并对其解密,导致用户的隐私泄露或直接财产损失。
解决方案
对so文件进行安全加固、可以使用第三方的安全平台so加固方案。
So文件找不到问题:java.lang.UnsatisfiedLinkError
couldn't find "libijkffmpeg.so"
报这个错误通常是so库加载失败,或者找不到执行的JNI方法。
解决:
- 建议检查so在安装的过程中是否丢失,没有放入指定的目录下。
- 调用loadLibrary时检查是否调用了正确的so文件名,并对其进行捕获,进行相应的处理,防止程序发生崩溃。
- 检查下so的架构是否跟设备架构一致(如在64-bit架构下调用32-bit的so)
代码展示
1 | ndk { |
lib相关
关于lib库无法使用资源文件问题
有时候我们的lib包无法使用资源文件或者依赖之后编译不过,常见有以下几个情况
1、使用了switch case,由于依赖工程中监听事件判断的时候使用了
比如:
1 | switch (v.getId()){ |
使用if else代替了
1 | int i = v.getId(); |
注意:根本原因是lib库中id不是常量的所以不能使用switch,如果其它地方调用到了这个方法,也要记住是不是这个引起的
aar相关
关于aar的包的问题
- moudle中的lib文件夹下的jar,aar和远程依赖必须用api引用否则APP依赖module后无法使用
- 如果moudle打包为aar给demo使用,则moudle中包含的aar和远程库无法引用,
必须再次导入demo中(应该是机制本身的原因,aar中无法引用aar和远程库) - 多层级Module对aar引用问题:
Failed to resolve::mylibrary-release
现象:有个aar文件放到ModuleA,ModuleB依赖ModuleA则会在编译过程中发生找不到aar文件的异常(同样如果ModuleC依赖ModuleB,也会有找不到这个aar文件的异常(ModuleC等下也是跟ModuleB一样处理))
解决:
i. 在ModuleB的build.gradle的dependencies中加入compile(name:'svprogresshud-release', ext: 'aar');
ii. 在ModuleB的build.gradle的android中加入
1 | repositories{ |
aar缓存问题
如果存在aar包缓存的问题,会发现一个问题:就是一直使用旧的aar包,而不是新的aar包
解决:所以有一点需要记住:直接关闭重新打开去解决
library依赖别的Module,library导出aar,缺少Module中的aar
解决:把每个module中的aar都复制到新项目上
library导出aar丢失远程依赖
根目录
build.gradle中添加1
2
3
4
5
6
7
8
9
10
11
12
13
14dependencies {
//...
//添加插件
classpath 'com.github.kezong:fat-aar:1.3.6'
}
allprojects {
repositories {
//...
flatDir {
dirs 'libs' //this way we can find the .aar file in libs folder
}
}
}app/build.gradle中添加1
2
3
4
5
6
7
8
9dependencies {
//...
//需要插入aar包的远程依赖
embed 'com.alibaba:fastjson:1.2.83'
embed 'com.blankj:utilcodex:1.31.0'
embed 'com.facebook.fresco:fresco:1.13.0'
embed "androidx.multidex:multidex:2.0.1"
embed 'com.google.protobuf:protobuf-java:3.20.1'
}