安装相关
手动安装 aab(Android App Bundle)
自 Android Studio3.2 起,输出 Android App 时就可以用官方推荐的新格式Andorid APp Bundle(aab)。上传 aab 至 Google Play 商店后,当使用者下载 App 时,只需要下载目前手机需要使用到的资源即可。例如一台像素密度为xhdpi的手机,只需要下载xhdpi的内容即可。又像是处理器架构、装置语言,不必要包所有支持的资源,例如使用Snapdragon 845处理器的手机,语言设定为繁体中文(台湾)。下载时只需要下载 arm64 架构与 zh-tw 语系的资源即可。
通过 aab 可以减少使用者下载安装 App 的事件,同时减少一些 App 的容量。但在 Android5.0(Lollipop,21)以前的装置无法支持这么弹性的安装方式。好在 Google Play 商店会自动帮我们编译传统的 apk 给旧版 Android 安装。
安装 aab 不能像过去安装apk 那样直接丢到装置上就行,需要通过手动安装,需要借助bundletool工具。开发者可在 bundletool的GitHub Repository下载,如果是 macOS 则可以通过brew来安装 bundletool。
$ brew install bundletool
安装完 bundletool,就能准备来安装。打开终端(Terminal)切换至aab所在文件夹。
第一步,通过aab产生 apks
1 | $ bundletool build-apks --bundle=<bundle_name>.aab --output=./<bundle_name>.apks |
如果要 build 签名过的 apks,还需要加上keystore的相关参数
1 | $ bundletool build-apks --bundle=<bundle_name>.aab --output=<bundle_name>apks -ks=<your_keystorename>.jks/.keystore --ks-pass=pass:<your_keystore_pass> --ks-key-alias=<your_keystore_alias> --key-pass=pass:<your_keystore_pass> |
通过以上命令,可以得到一个 apks。再通过bundletool,将这个apks安装到设备上。
1 | $ bundletool install-apks --apks=<bundle_name>apks |
安装完毕,Android 设备不会有任何特别的反应。但可以在设备 App 列表中看到
- 可以比对通过 aab 给我们安装的 apk 包比 Google Play 商店上的小了多少。
Google Play:版本管理–》应用程序版本–》探索 App Bundle。 - 另外,可以通过“探索 App Bundle”下载指定设定的 apk
- 未使用 Android App Bundle 之前可以先设定完Google Play 应用程序签署,才能开始用 App Bundle。
普通应用安装
安装相关问题
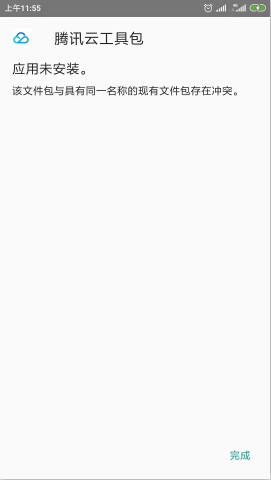
安装失败
- 失败原因:应用组件的命名与已安装应用有冲突
- 可能是包名问题(已安装 app 有相同包名)
解决:需要重新定一个包名,同时在相关第三方平台上要改掉包名 - 可能是provider的authorities问题(已安装的 app 有相同的 authorities)
解决:正在安装的 app 的 authorities 改另一个名称(随便改,可以带上 applicationId)
- 可能是包名问题(已安装 app 有相同包名)
Failure [INSTALL_FAILED_DUPLICATE_PERMISSION: Package com.rcw597.app attempting to redeclare permission com.rcw597.app.permission.C2D_MESSAGE already owned by com.xm597.app]
原因:不同签名的安装包中有相同的自定义的permission
解决:把com.rcw597.app这个前缀用${APPLICATION_ID}替换,当然要确保不同app的APPLICATION_ID的值是不一样的
解析包出现错误
- 可能问题:包名有大写
- 可能问题:下载下来的apk与服务器的apk大小不一样 解决:
1
2
3
4
5
6
7
8
9
10
11
12
13
14
15
16
17
18
19
20
21
22
23
24
25
26
27
28
29
30
31
32
33
34
35
/**
* @param path下载地址
* @param filePath存储路径
* @param progressDialog进度条
* @return
* @throws Exception
*/
public static File getFile(String path,String filePath,ProgressDialog progressDialog) throws Exception{
URL url = new URL(path);
HttpURLConnection connection = (HttpURLConnection) url.openConnection();
connection.setConnectTimeout(2000);
connection.setRequestMethod("GET");
if(connection.getResponseCode() == 200){
int total = connection.getContentLength();
progressDialog.setMax(total);
InputStream is = connection.getInputStream();//获得socket输入流
File file = new File(filePath);
FileOutputStream fos = new FileOutputStream(file);//file输出流
byte[] buffer = new byte[1024];
int len;
int progress = 0;
while((len = is.read(buffer)) != -1){
fos.write(buffer);
progress += len;
progressDialog.setProgress(progress);
}
fos.flush();
is.close();
fos.close();
connection.disconnect();
return file;
}
return null;
}1
byte[] buffer = new byte[1024];
这行代码,把1024改成了128,又改成了64,结果就没问题了。
- 可能问题:已经安装完毕,点“返回“报错是代码中在安装完毕后加了回调 startActivityForResult..
解决:在安装完毕后加 return1
2
3
4
5
6
7
8
9
10
11
12
13
14
15
16
17
18
19// 安装apk
private void installApk(File file) {
Intent intent = new Intent(Intent.ACTION_VIEW);
if (Build.VERSION.SDK_INT >= Build.VERSION_CODES.N) {
intent.setFlags(Intent.FLAG_GRANT_READ_URI_PERMISSION);
Uri contentUri = FileProvider.getUriForFile(activity, BuildConfig.APPLICATION_ID + ".updateProvider", file);
intent.setDataAndType(contentUri, "application/vnd.android.package-archive");
//兼容8.0-26
if (Build.VERSION.SDK_INT >= Build.VERSION_CODES.O) {
AppUtils.installApp(file, BuildConfig.APPLICATION_ID + ".updateProvider");
//兼容8.0以上的安装完毕需要加return,否则有安装成功但是弹出“解析包失败”的页面来误导用户
return;
}
} else {
intent.setDataAndType(Uri.fromFile(file), "application/vnd.android.package-archive");
intent.setFlags(Intent.FLAG_ACTIVITY_NEW_TASK);
}
activity.startActivityForResult(intent, 999);
}
安卓8下不跳转安装页问题
低版本的blankj.utilcode(如”com.blankj:utilcode:1.10.0”)需要在App.java中添加初始化操作。
在升级页面VersionUpgradePresenter.java的安装apk逻辑中添加
1 | //兼容8.0 (API26) |
完整安装apk的代码:
1 | protected void installApk(File file) { |
AS运行安装失败“Installation failed due to: ‘null‘ ”
- 把包通过adb命令行进行安装,如果提示
查看是否有另一个安装包的<provider标签下的authorities值一致。
解决:现在的安装包改个authorities值即可(这个值不影响使用)
Installation failed due to: ‘null’
Android Studio 中的消息
如果您的应用包含使用 intent 过滤器的 activity、服务或广播接收器但未声明 android:exported,系统会显示以下警告消息,具体取决于您使用的 Android Studio 版本:
Android Studio 2020.3.1 Canary 11 或更高版本
系统会显示以下消息:
清单文件中会显示以下 lint 警告:
1 | When using intent filters, please specify android:exported as well |
当您尝试编译应用时,系统会显示以下 build 错误消息:
1 | Manifest merger failed : Apps targeting Android 12 and higher are required \ |
较低的 Android Studio 版本
如果您尝试安装应用,Logcat 会显示以下错误消息:
1 | Installation did not succeed. |
INSTALL_FAILED_DUPLICATE_PERMISSION
1 | Installation did not succeed. |
原因:
- 正要安装的APP的自定义权限与手机上已有的APP的自定义权限名字相同,但两个APP具有不同的签名信息导致安装失败;
- Android L(android 5.0)以上系统限制。
解决: - 俩不同包的签名弄成一致;
- 若只想验证当前包,卸载掉已安装的 app(有相同权限冲突的安装包)
运行项目,桌面图标不见了
android APP图标消失不见的 第 三 种 情况_baidu_36583608的博客-CSDN博客
我的解决:打开手机设置找到这个应用,点卸载。重新运行项目,图标出现了。
同事曾经解决方案:
- 重启手机解决。
- 补全对应分辨率的图标解决。
- 还有可能原因是部分手机不支持圆角图标。
The APK does not exist
问题:The APK file xxx.apk does not exist on disk. Error while Installing APK
1 | variant.outputs.each { output -> |
给apk文件重命名时发生了问题, 如果除.apk之外的文件名中还包含. 的话, 可能会出现这个问题,
好吧 将重命名格式改的简单点, 问题就解决了